Easy to make Valentine’s Day Cookies boast a delicious chocolate flavor and are beautifully and simply decorated with delicate royal icing hearts. Ideal for Valentine’s Day, anniversaries, or just because, these adorable cookies are a delectable way to say “I love you.”
Love cookies? Make sure to check out my original sugar cookie recipe and Chocolate Sugar Cookies!

These adorable heart cookies are so delicious and easy to make! The perfect treat for Valentine’s Day or any time you want to show a little love to someone special.
Delicious chocolate sugar cookies are decorated with my classic royal icing and using a simple technique, create a string of hearts on top of the cookies. This technique requires zero special equipment! All you need is a toothpick!
I love when a simple technique can be used to make something look extra special. These heart Valentine’s cookies are super easy to decorate, but yield impressive results.

I started with a batch of Chocolate rolled cookies. I used a medium sized heart cutter to cut my shapes, then a small heart to cut out the center. You can bake up the mini hearts, or roll the dough back together to make more hearts with cut-outs.
When your cookies are baked and cooled, prepare a batch of Royal Icing. To copy this design, you’ll only need two bags of icing, one red and one white, both in a medium consistency. Certainly, adding pink details to these cookies would be beautiful as well.
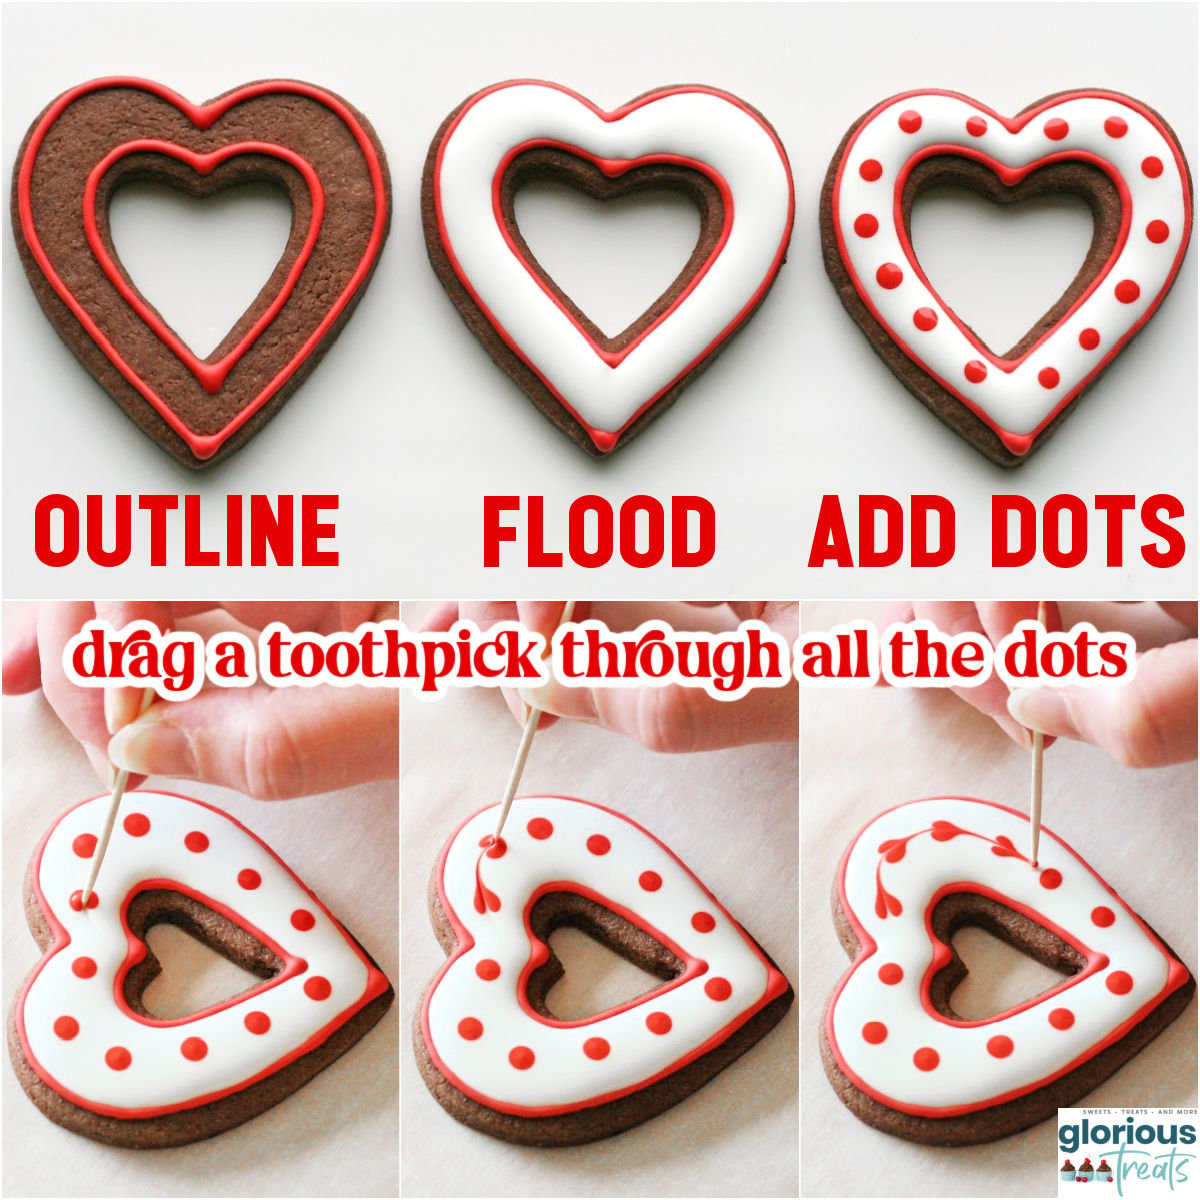
How to create a string of hearts with Royal Icing
- Outline the cookies (as shown). Allow the outline to set up a bit (about 30 minutes).
- Flood cookie with white icing.
- Immediately, add dots (as shown).
- As soon as dots have settled into the white icing (about 30 seconds), drag a toothpick from the top center of the heart cookie, through the first dot. Continue dragging the toothpick through all of the dots on one half of the cookie, in one continuous motion (as seen above).
- Repeat on the other side of the cookie, starting at the top, drag a toothpick through the dots.
- Allow cookies to dry (about 8 hours)

Storage Information
Storage. Baked cookies will remain fresh at least one week stored in an airtight container or individually wrapped at room temperature.
To Freeze. Baked cookies can be successfully frozen for a month or more. Layer baked cookies in a freezer safe, airtight container with parchment paper between layers of cookies. Thaw cookies at room temperature before decorating. I do not recommend freezing the cookies after they’ve been decorated.
Royal Icing
- Make sure all bowls and utensils are totally grease-free or your icing will never reach proper consistency.
- The thickness of the icing can be controlled but how much water is added. You will need a medium consistency for these cookies.

More Valentine’s Day Treats To Try
- Valentine’s Cookie Sticks
- Red Velvet Cupcakes
- Valentine’s Snack Mix
- Handpainted Valentine’s Cookies
- Chocolate Cheesecake for Two

Heart Valentine’s Day Cookies
Ingredients
Chocolate Cookies
- 3 cups all purpose flour
- ½ cup unsweetened cocoa powder
- ½ teaspoons baking soda
- ½ teaspoon salt
- 1 cup unsalted butter room temperature
- ⅔ cup granulated sugar
- ½ cup brown sugar
- 1 egg room temperature
- 2 tablespoons chocolate liqueur or extra strong coffee this can be made with about 1 teaspoon of instant espresso dissolved into 2 Tablespoons warm water
- 1 teaspoon vanilla extract
Royal Icing
- 4 tablespoons meringue powder
- 4 cups powdered sugar about 1 pound
- 6 tablespoons warm water to start
- gel food coloring
Instructions
Make Cookies
- Sift together (or gently stir with a whisk) the flour, cocoa powder, baking soda and salt. Set aside.
- With an electric mixer cream together the butter, granulated sugar and brown sugar until fully incorporated and fluffy.
- Beat in egg, coffee or liqueur, and vanilla.
- Add in flour/cocoa mixture about 1 cup at a time. Blend until fully incorporated. (If you are using a hand mixer you may need to add the last cup of flour by hand).
- Divide dough into two or three large balls, place in a plastic bag and chill in the refrigerator 1-2 hours (if you’re in a hurry, you can chill the dough for about 20 minutes in the freezer).
- Once chilled, work with one ball of dough at a time, and roll onto a lightly floured surface. I find it works best to place a sheet of parchment paper on top of the dough, and then roll on top of the parchment. This prevents the dough from sticking to your rolling pin, and you also don’t need to add as much extra flour (as you would without the parchment).
- Cut out desired shapes with cookie cutters and place on a baking sheet.
- Place the baking sheet (with cookies on it) in the freezer about 5 minutes (this helps the dough keep it’s shape when baked).
- Bake cookies for 7-10 minutes (depending on size) in a 350*F oven.
- Allow cookies to cool on baking sheet a few minutes and then transfer to a wire cooling rack.
Icing
- Beat all ingredients until stiff peaks form. Spoon some of the thick white icing into individual bowls and add coloring.
- Add additional water, about 1 teaspoon at a time until you’ve reached the consistency you need.
- To copy this design, you’ll only need two bags of icing, one red and one white, both in a medium consistency. Certainly, adding pink details to these cookies would be beautiful as well.
- Outline the cookies (as shown above in the post). Allow the outline to set up a bit (about 30 minutes).
- Flood cookie with white icing. Immediately, add dots (as shown).
- As soon as dots have settled into the white icing (about 30 seconds), drag a toothpick from the top center of the heart cookie, through the first dot. Continue dragging the toothpick through all of the dots on one half of the cookie, in one continuous motion (as seen above).
- Repeat on the other side of the cookie, starting at the top, drag a toothpick through the dots.
- Allow cookies to dry (about 8 hours).


brilliant !!!
i do not comment on the Internet much, but this idea, is just AWESOME
too bad i did not find it earlier, as i wont find sich heart shaped plate in time, but this is simply breath taking..
and many many good ideas on this blog too 🙂
keep it up, excellent, really manifique work 🙂
piece of art and hats down 🙂
will surprise my loved one with this 🙂
Thank you very much for this tutorial. I made these cookies for Valentine’s Day and they were such a success. My daughters took them at school and their classmates went crazy 🙂 Although it was a rainy day when I made the royal icing and it was not perfect like yours 🙂
OH MY! This are the cutest cookies I’ve ever seen! Beautiful! Thank you for sharing it! I will try make some on my own! Thank you!
Maja
felicitaciones es muy lindo lo que haces es un arte
Beautiful and so easy!! i don’t know why but I never though about making an outline first….
Wonderful ideas to show your points 🙂
Kwik-Snow is a fun and exciting product that makes artificial snow in seconds. Kwik-Snow will provide hours, days and even weeks of fun for both kids and adults. Now you can have instant snow anywhere on demand even where it never snows, Kwik-Snowc an make artificial or fake snow decoration even in the middle of the desert. Imagine being the envy of all your neighbours.
Simply PERFECTION in every way!
Maryann
@Tip size- I used a #1.5 PME brand tip to outline, but you could use a #2 as well.
these look amazing!
I'm going to attempt them so could you please tell me what size piping tip you use for the red outlines?