Spring is one of my favorite times of year to decorate cookies! These cute and easy decorated Easter egg cookies are such a sweet way to celebrate this beautiful time of year. With just a few colors of icing and a simple egg cutter, the decorating options are endless!
In fact, this batch of cute cookies came together for me in almost no time… well, that’s mostly because I didn’t make them! This sweet set was made by my talented friend Bethany, of Auntie Bea’s Bakery.
I’ve recently found myself in over my head with a few different projects, and asked Bethany if she had time to share some of her talent here on Glorious Treats. I’m so happy she said yes!
Now I’ll pass it over to Bethany and she’ll walk you through the details of these pretty cookies!
~~~~~~~~~~~~~~~~~~~~~~~~~~~~~~~~~~~~~~~~~~~~~~~~~~~~~~~~~~~
Hi there! My name is Bethany, I’m known here in the cookie world as Auntie Bea.
When Glory asked me to be a guest blogger on Glorious Treats, I VERY excitedly said yes! She was looking for something fun for Easter that would be cute yet simple. We came up with these adorable Easter egg cookies that can be done using only one icing constancy and only one piping tip!
Easter Egg cookies are literally one of my favorite cookies to make. They can be decorated in so many ways, from elaborate and filigreed to simple polka dots. These eggs are somewhere in the middle, but super easy! Your Easter guests will think you spent DAYS on them!
I started with a basic sugar cookie dough. Using the good ol’ Wilton egg cookie cutter (found in the 101 cookie cutter set) I cut out my cookies. Once the cookies were cooled, I made my icing. I prefer “20 second” royal icing instead of outlining and flooding. It’s quick and easy and you can do both steps with one bag!
Ok, now comes the fun stuff…..
Color your icing with your desired egg colors. I chose pink, white, yellow, green and purple. Fit your piping bags with #2 tips (I only used 1 bag per color). The #2 tip is my favorite! It’s large enough to fill in background color but small enough to pipe details. That being said, now it’s time to “color” your eggs.
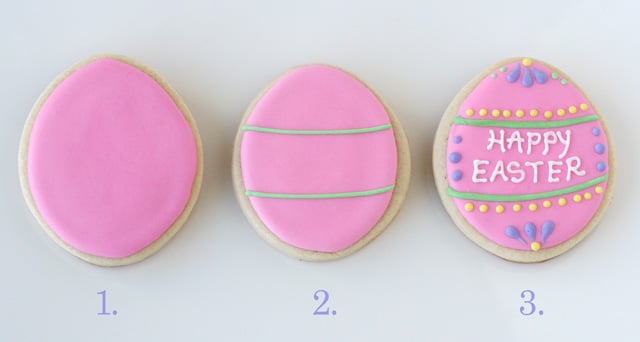
(1.) Once you have filled in the background color you will need to let it dry completely. I like to let them dry overnight. But if you don’t have the time, try to wait at least 4 hours. They need to be dry to the touch otherwise the colors can bleed.
(2.) After the background has dried, start by piping the center outline. I like to divide the cookie into thirds. That way I get nice, even spacing.
(3.) Now add some simple details around the center. I used polka dots, lines and zigzags.
I fill in the center area last. This is really the focal point of the cookie and I like to make that part extra special! You can add a message or a name or pretty “dot” flowers (to make: start by piping a dot with your tip then drag the tip down using the same amount of pressure so the dot becomes a petal). Add a couple extra polka dots and wha-la! A pretty, detailed cookie that is simple as pie!
These cookies would be perfect wrapped individually in Easter baskets or simply placed on a pretty platter.
I hope you all enjoyed my little tutorial. Thank you Glory for giving me the opportunity to share it with your readers.
Happy Decorating, Auntie Bea
~~~~~~~~~~~~~~~~~~~~~~~~~~~~~~~~~~~~~~~~~~~~~~~~~~~~~~~~~~~
Thank you so much Bethany! I love these sweet and perfect Easter Egg Cookies so much!
To keep up with all of Bethany (Auntie Bea’s) beautiful sweets, be sure to bookmark her site Auntie Bea’s Bakery, and follow her on Facebook and Twitter.
And if you’d rather order cookies than make them, you’re in luck! Bethany sells her beautiful and delicious cookies in her Etsy Shop!
(images in this post by Glorious Treats)




I haven’t found a royal icing that works well…I think I am mixing it wrong. What is your 20 sec royal icing recipe? Your’s turns out so smooth.
What is the recipe you use for 20 second royal icing?
These are beautiful! I’m a total newbie but would love to get started doing this for my family. What is the difference between royal icing and “20 second” royal icing? Is there a recipe for it? Thanks!
“20 second” royal icing, is royal icing, but it’s refering to the consistency. For 20 second icing, that means as you are mixing it up if you drag your spoon through the icing, it will take about 20 seconds (or more likely about 15 seconds) for the line to disappear. This consistency allows you to outline and flood/fill in with the same icing. The traditional method with royal icing would be to make two consistencies of icing, one thick and one thin, and outline with the thick, then fill in with the thin. For simple designs (such as these eggs), it makes things much quicker to be able to use just one consistency for both steps.
Great tutorial Bea!!!
Cute and easy and oh so very pretty! Your *piping script* is lovely.
Absolutely adorable. I’d love a big basket of these for Easter!!
Hola. Me han gustado mucho tus galletas. Te han quedado preciosas. Gracias por las ideas
Raquel
These are so pretty Glory! Love them!
I love these so much! For the past couple of years I have been meaning to decorate sugar cookies but have somehow never seemed to have gotten it done. This year I am so gonna make some like this 🙂
I thought they were Glory’s cookies at first:) You BOTH make beautiful cookies! Love the colors and design variety.