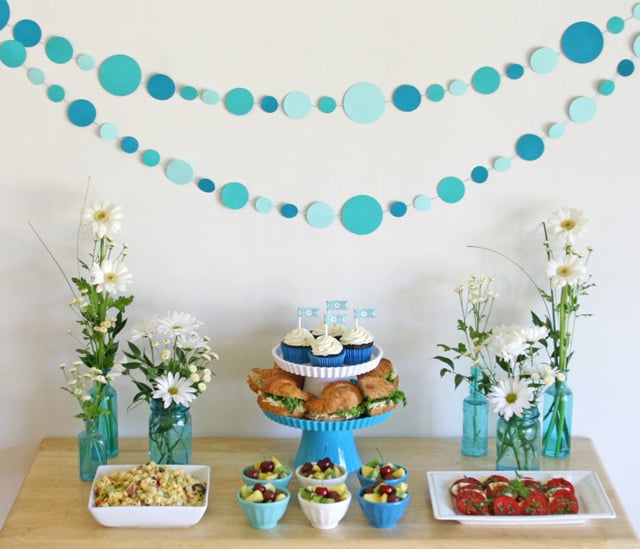
Several weeks ago I shared this simple yet pretty Blue and White Party (pictured), which included an easy D.I.Y. Paper Polka Dot Garland as decoration. I promised I’d share the full tutorial, but the weeks have clipped along and I’ve been busy sharing cupcakes and punch and ice cream. So before I get distracted again, I’m here to share the instructions on this easy paper garland.
This fun polka-dot garland is quite simple to make, could be made in any color and for most any occasion. The options are limitless for this fun garland… hang it behind a dessert or food table (as shown), hang it in front of your fireplace mantle (while not in use!), hang it in front of a window, or hang it in a child’s bedroom.
I love party crafts that can be made weeks in advance, and then take only moments to set up before the party.
Here’s how to make the paper polka-dot garland…
How to make a Paper Polka-dot Garland
Supplies needed
- Craft glue
- Cardstock weight paper in the color(s) of your choice.
- Twine, string or thin ribbon
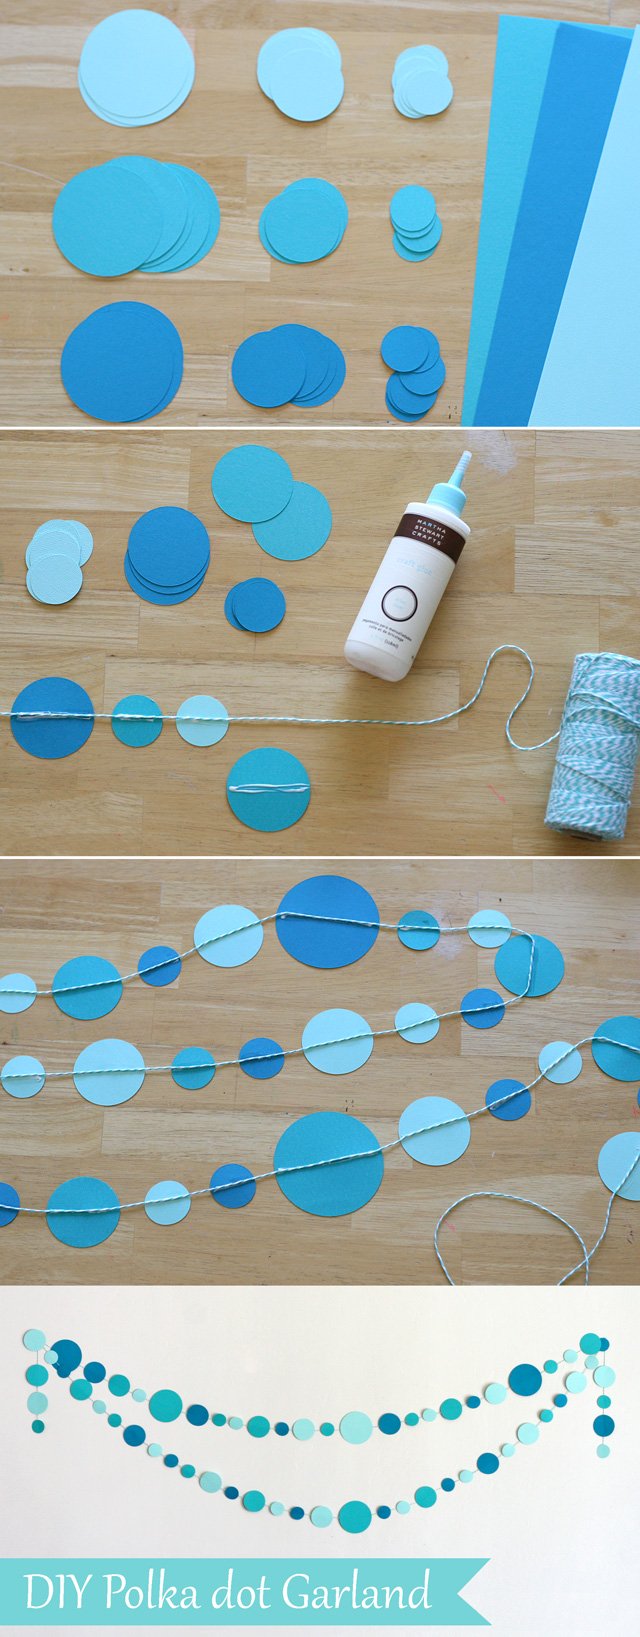
1. Cut out various sized paper circles using a paper punch, or cutting machine (such as a Cricut or Silhouette). Feel fee to make all the circles the same size if you like. For this garland I used circles that range from 1.5″-3.5″ diameter. I also used three different shades of blue paper. Use cardstock weight paper.
2. Line up the circles in a pattern, or randomly (as I did). Lay out a piece of twine (I used bakers twine from Bakers Stock), do not cut it, just roll it off of the roll. Apply a very thin bead of craft glue along the center of a paper circle, then lay the twine on the glue. (Do not use too much glue or it may warp the paper a bit)
3. Continue gluing the twine to the circles, spacing as desired. Allow to dry flat until the glue is fully dry.
Optional- If you will be hanging the garland where it will be viewed from both sides, you may want to put two matching circles back to back, with the twine glued in-between, although I don’t think it’s necessary.
Happy Crafting!
Hi,
I made this garland for a background photoshoot and did 3″-1.25″ diameter manually. Boy, it was hard. So i want to make more for a birthday party but I couldn’t find a puncher that can cut a 3.5″. The extra large puncher I’ve seen is only 2.5″. I got this martha stewart circle cutter but the smallest circle it can cut is 4″. What kind of puncher did you use? I wish I can get all sizes in one. Cricut or Silhouette are just too expensive. Thank you!
Hi! I followed your tutorial here for a baby shower I am having in a few weeks. When I finally hung my garland up this morning some of the circles are flipping forward, some completely and some just kind of floating halfway turned around.
I can send you a pic if that helps you understand the problem any. Any suggestions on how to make them all face forward? Do you think it has anything to do with where I glued (center of circle) does it need to be closer to the top? Thank you!
Kristin
Hi Kristin, The garland pictured is taped to the wall, so there is no way the pieces could flip around. I’m guessing you’re trying to hang yours in mid air? If you’re hanging it so all sides are exposed, I might suggest gluing circles back to back, so the string is not exposed even if the pieces do flip around.
I’ve made this using circle-punched pictures from greeting cards and magazines; thick paper works best. Used double-stick tape and 2 circles. The circles can be different sizes. Also taped on large sparkly sequins. The tape speeded up the process.
This looks lovely, creative and adds dimension. So cute!
Super cute. Who doesn’t love polka dots!
What a great idea, easy to make but super effective! 😀
This is so pretty ,and you make it look so easy! I think I need to make one for my next party…or just because. 🙂
very nice.
That looks easier than I expected. Cool. =)
Love the color combination! I have used one size circle punch and red, white and blue card stock. I sewed mine and hung strands vertically from a curtain rod in my transom widow ove my front door.
Blessings,
Lorilee