These adorable Snowman Face Cookies are so fun to make and are perfect for all your holiday gatherings! Made with my favorite sugar cookie recipe and decorated with my simple royal icing recipe, these charming snowmen come to life, making them the star of any winter gathering or cozy family night!
Looking for more holiday cookie recipes? Make sure to check out my Chewy Ginger Molasses Cookies, Gingerbread Cookies and these adorable Spritz Snowflake Cookies!

As much as I love traditional Christmas colors, when it comes to cookies I often find myself leaning toward pastels. These cute Snowman Face Cookies could be made in most any color scheme, but I do think they look extra sweet and wintery in these soft colors.
I’ve made this fun design a few times, but have yet to take the time to share them here! Last year I made a whole platter of these Snowman Face Cookies for my daughter to share with her class on the last day of school (before Christmas). I made sure to include the right amount of “girl colors” and “boy colors” for the class =)
I first feel in love with this cute and simple design several years ago when I saw these cute snowmen face cookies. I believe I first saw the alteration of using an ornament cutter (instead of a circle) from Sweet Sugar Belle.
What You’ll Need
Want to make some of these cute cookies? Here’s what you’ll need…
- A batch of sugar cookies (here’s my Sugar Cookie Recipe).
- A batch of royal icing (here’s my Royal Icing Recipe).
- A round ornament cookie cutter. Depending on the style of cutter you use, you may need to trim the top of the ornament a bit before baking. You could also use a circle cutter for these cookies, you’d just need to alter the top “puff ball” a bit.
- White non-pareils (sprinkles).

How To Make Snowman Face Cookies
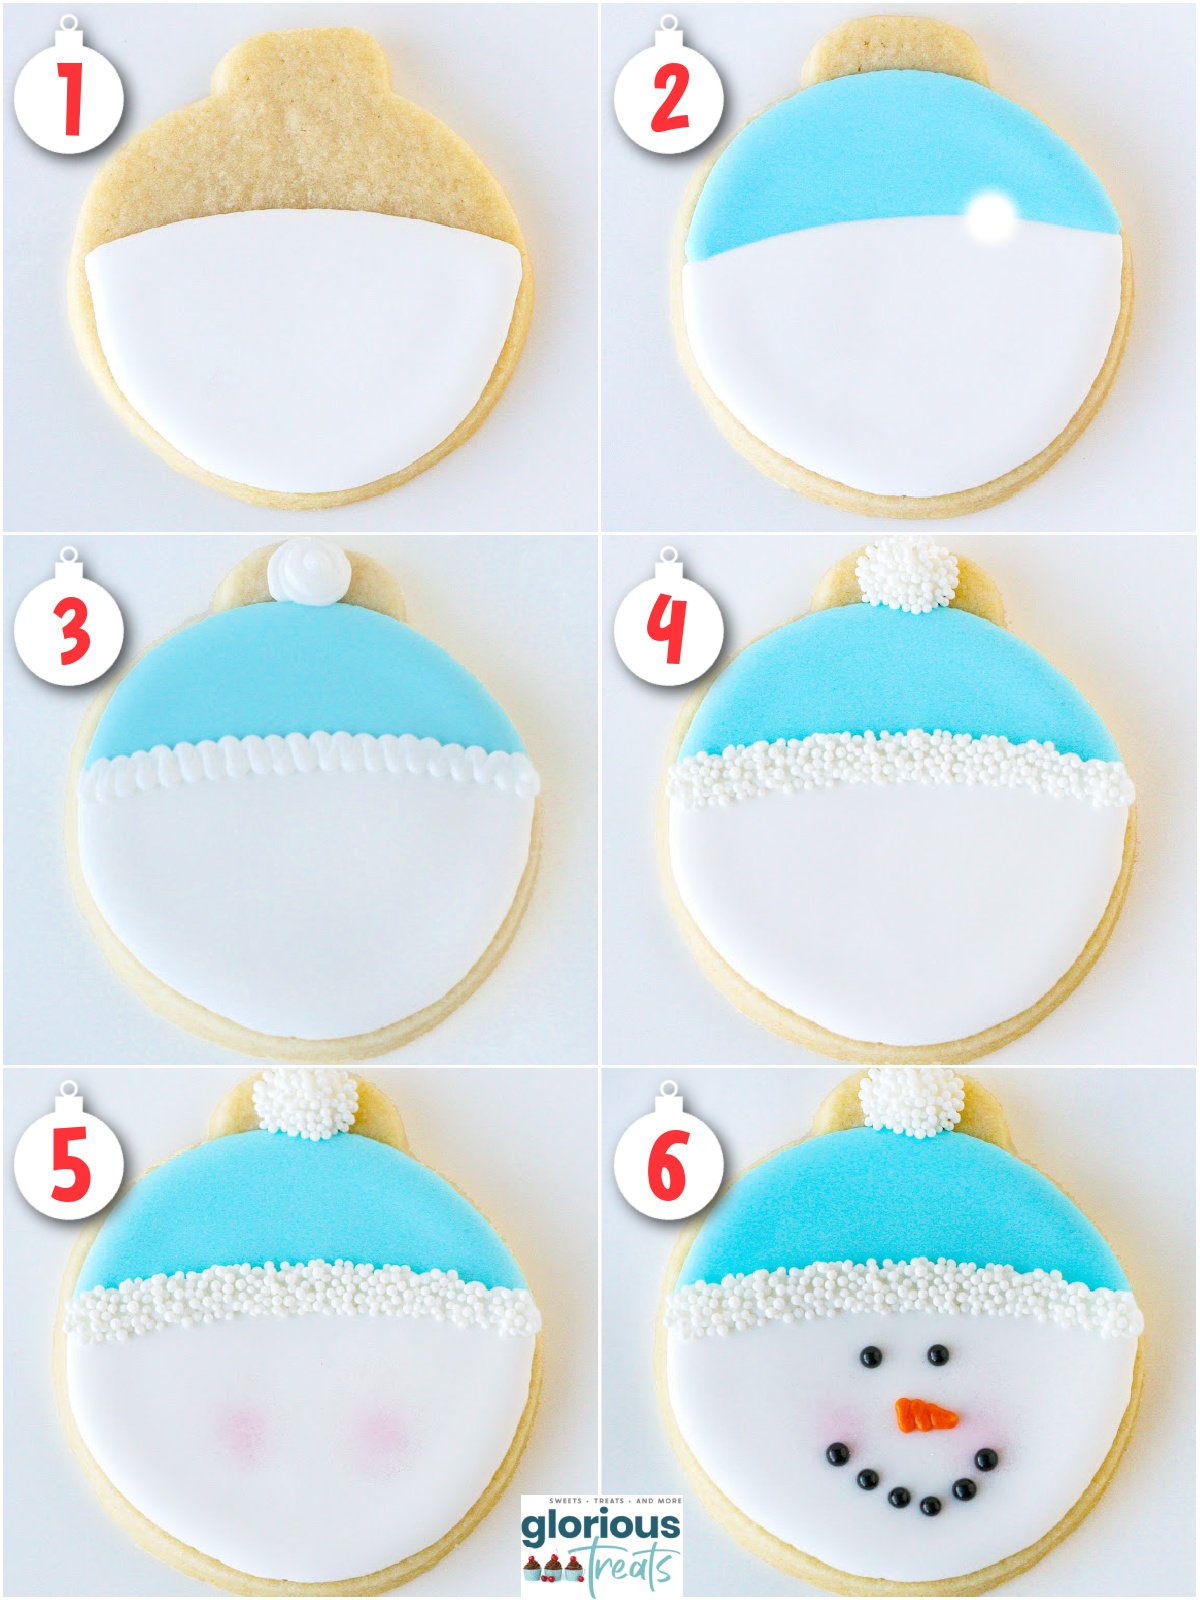
- Using a medium consistency icing (white), outline and fill in the face portion of the cookie (as shown). Allow this to set about 30 minutes.
- Using a medium consistency icing (any color choice), outline and fill in the hat portion of the cookie (as shown). Allow this area to dry fully (4+ hours).
- When the hat and face areas are dry, use a thick consistency icing (white) and add the rim of the hat and the “puff ball” on top of the hat (as shown).
- Immediately sprinkle non-pareils (or sprinkles of your choice) onto the wet icing (as shown).
- Add a hint of blush to the cheek area using pink luster dust and a (clean and dry) soft paint brush.
- Add details to the face (eyes and mouth with black icing, nose with orange icing). Allow to dry fully before packaging.
Storage Information
If you do not plan to decorate the cookies the day you bake, transfer cookies to a large airtight container, layer with parchment paper between layers of cookies. Cookies can be stored at room temperature for up to 1 week. If you do not plan to decorate the cookies within a week, place the entire container of cookies (sealed well, and with parchment paper between layers of cookies) in the freezer.
Decorated sugar cookies should be stored in an airtight container, layered with parchment paper between layers of cookies or transferred to individual cellophane bags.
Can I freeze these cookies?
Yes, but I recommend freezing before decorating. When sealed well and separated by a layer of parchment paper, these cookies can be frozen for up to a couple months. To thaw, simply let them sit on the counter and come to room temperature. If you want to decorate them, allow frozen cookies to come to room temperature before decorating.
These cute cookies are sure to bring smiles to anyone you share them with!
Looking for more “sweet” Christmas ideas? I have lots more decorated cookies as well as party ideas and other sweets on my Christmas/Winter posts page.
Happy decorating!

The Best Christmas Cookie Recipes
- Snowball Cookies
- Cranberry Pecan Shortbread Cookies
- Winter Wonderland Cookies
- Chewy Ginger Molasses Cookies
- Cranberry Orange Cookies

Snowman Face Cookies
Ingredients
Sugar Cookies
- 3 cups all purpose flour
- 1 teaspoon baking powder
- ¼ teaspoon salt good quality
- 1 cup unsalted butter 2 sticks, room temperature
- 1 cup sugar
- 1 egg large
- 1 teaspoon vanilla extract
Royal Icing
- 4 tablespoons meringue powder
- 4 cups powdered sugar about 1 pound
- 6 tablespoons warm water to start
- food coloring
Decorations
- white non-pareils (sprinkles)
- pink luster dust
Instructions
Sugar Cookies
- In a medium bowl, stir together the flour, baking powder and salt, and set aside.
- In the bowl of an electric mixer, using the paddle attachment, cream together the butter and sugar until light and fluffy. This should take 2-3 minutes.
- Add the egg and vanilla and beat another minute or so.
- Add the flour mixture slowly. (Be careful not to add too much at a time or you will have a snowstorm of flour.)
- Blend until all of the flour is incorporated. The mixture will look crumbly at first but just keep blending until the dough begins to pull away from the sides of the bowl.
- Remove about half of the dough from the bowl and knead by hand just a bit to form a smooth ball. Roll out dough onto a lightly floured work surface, or onto a piece of plastic wrap (as described in detail in the blog post above).
- Cut out cookies into desired shapes and place entire baking sheet of unbaked cookies into the freezer for 5 minutes. (A round ornament cookie cutter is what I used. Depending on the style of cutter you use, you may need to trim the top of the ornament a bit before baking. You could also use a circle cutter for these cookies, you’d just need to alter the top “puff ball” a bit.)
- Preheat oven to 350°F and bake cookies in preheated oven for 9-11 minutes, depending on the size and thickness of your cookies.
- The cookies are baked when then are no longer shinny on top, but they will not show much of any change in color.
- Cool on baking sheet just a minute or so, then carefully move to a wire cooling rack and allow to cool fully before decorating.
Royal Icing
- Beat all ingredients until stiff peaks form.
- Spoon some of the thick white icing into individual bowls and add coloring .
- Add additional water, about 1 teaspoon at a time until you’ve reached the consistency you need.
Decorating
- Using a medium consistency icing (any color choice), outline and fill in the hat portion of the cookie (as shown). Allow this area to dry fully (4+ hours).
- When the hat and face areas are dry, use a thick consistency icing (white) and add the rim of the hat and the “puff ball” on top of the hat (as shown).
- Immediately sprinkle non-pareils (or sprinkles of your choice) onto the wet icing (as shown).
- Add a hint of blush to the cheek area using pink luster dust and a (clean and dry) soft paint brush
- Add details to the face (eyes and mouth with black icing, nose with orange icing). Allow to dry fully before packaging.



These are so cute! I want to make them. I’m just curious as to how you make the consistency of the icing from medium to thick?!
Hi Kambree,
The base royal icing recipe (linked in the blog post above) will produce a very thick icing. From this very thick icing, you need to add small amounts of water to thin the icing. So for any cookie design that you need two different consistencies of the same icing, color the icing as needed, then thin just a bit to create the “thick” consistency (about the consistency of toothpaste), add a portion of that icing to a piping bag, then continue to add a bit more water to the remaining icing in the bowl to create a thinner “medium” consistency icing (about the consistency of shampoo). Happy decorating!
I have 4 great grandbabies coming in October. I am going to make thesr cookies as
shower favors. I have 2 twin girls, 1 boy and and one we do not know. I am going to put 2 cookies in pink for the girls, I in blue for the boy and a lavender for the surprise. I will change the nose a bit. I think these will be adorable. I am anxious t make a sample batch to try.
What amazing delicate beautiful biscuits.. Your ideas and work is amazing. I basically bake for home parties etc and as my daughter is allergic to raw egg I stay clear of meringue powder and royal icing . Is there another recipe without egg that can be used in the same way.
Hi Glory, these cookies look amazing. I am in Australia and am wondering how much a stick of butter weighs?
Cutest Christmas cookies ever!
i love your colours, especially the blue/turquoise. Would you post the colour you used and how you mixed it to get that blue??? thanks.
Wonderful !!!!
These little snowmen cookies are sooo cute! ..as are the snowflakes. 🙂