Let’s start from the beginning… The title of this post “Fondant 101” implies that this will be a post that will teach you the basics of fondant, and that is true. But the title may also imply that I am an expert on the topic of fondant, and I’m not so sure that’s true.
When I first threw myself into decorative baking (about 4 years ago) I had a fear of fondant… all I knew about it was that some people don’t care for the taste, and that (some) bakers can do amazing things with it. I had never tasted fondant or attempted to work with it. I enrolled in a one night course through our local parks and recreation department on “Gourmet Cookie Decorating” and that night, I learned how to cover cookies with fondant. I also discovered that night, that fondant is not so scary after all. I’m hoping that after you spend some time reading this post you may feel the same way.
Fondant 101 ~
Fondant (also known as rolled fondant) could be described as a sugary play-dough. Pre-made fondant is made mostly from sugar, gelatin, and glycerin. Fondant can also be made at home using powdered sugar and melted marshmallows (this is called Marshmallow Fondant- recipe link at the end of this post). Pre-made fondant is sold at craft stores, cake supply stores and on-line. The brand of fondant I prefer to use is called Satin Ice. This is also the brand most often used by cake professionals. The brand most commonly available at craft stores, Wilton, has a reputation for having a pretty poor taste, and I would avoid using it if possible (sorry Wilton, just my opinion!)
Fondant can be used for decorative baking in a number of different way. Cakes, cupcakes and even cookies can be covered with layer of fondant. Fondant can also be used to add decorative accents onto frosted cakes, cupcakes and cookies. Fondant can be shaped using special fondant molds and cutters, or hand molded into any shape or design imaginable.
Here are a few examples of the ways I’ve used fondant…
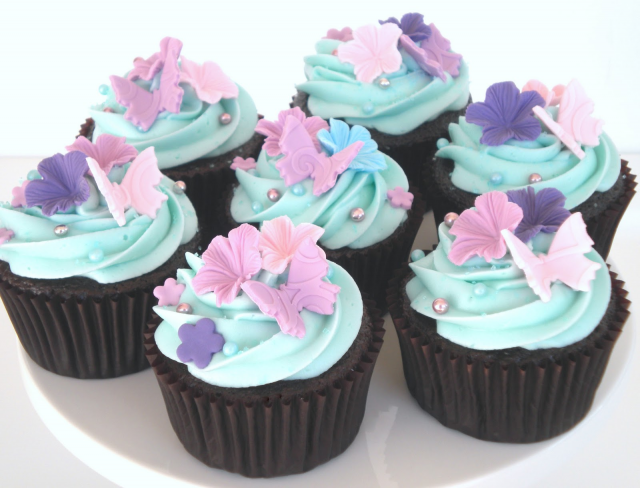
~Fondant covered cupcakes ~
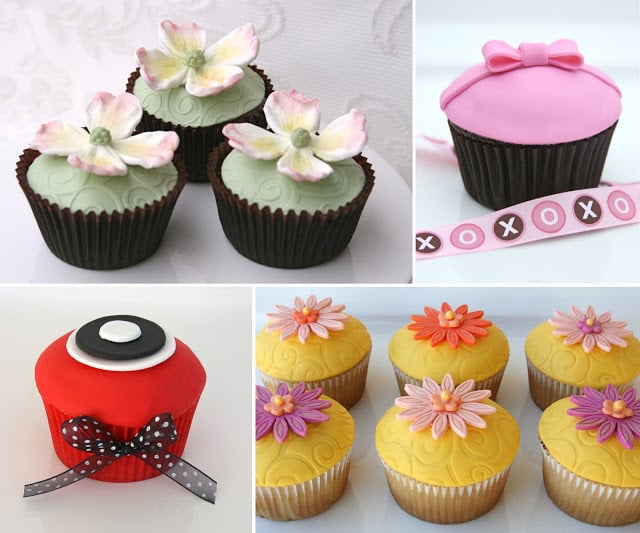
~ Fondant covered cookies ~
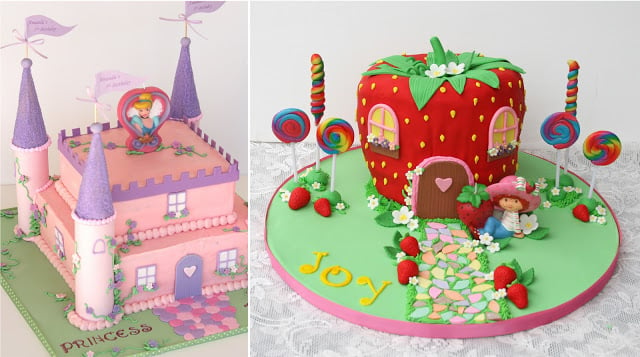
~ Fondant covered cakes ~
Over the next few months (and beyond) I will come back and add links to this post as I go into more detail on specific fondant projects.
Fondant Graduation Caps (as cupcake toppers)
How to make Fondant Ribbon Roses
How to make Fondant Butterflies
For today, in keeping with the “Fondant 101” theme of this post, I’ll show you the very basics for handling and preparing fondant for any project.
As with any craft project, preparing an organized work station with the proper supplies will help you work efficiently and allow you to enjoy your project with limited interruptions (children not included!).
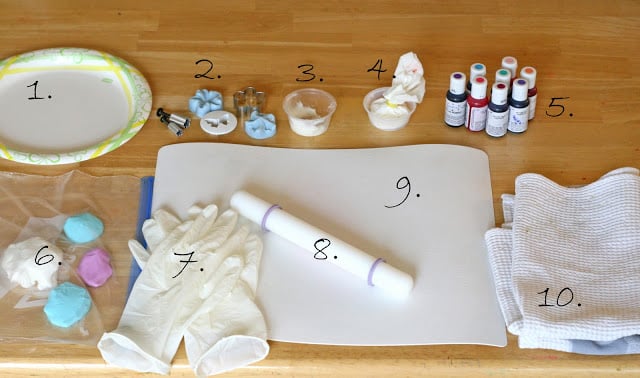
Above is a photo of the way I set up my work station (a.k.a. my dinning table). You don’t have to set up your work area exactly like mine, but I think this will give you an idea of the basic supplies needed.
1. A paper plate to set fondant pieces on to dry.
2. Fondant cutters (these could be small cookie cutters, or cutters designed for fondant- see my source list at the end of this post)
3. A small bowl of vegetable shortening (Crisco). This will be worked into your fondant (in a small amount) to help keep it pliable, and applied to your hands (or gloves) to prevent sticking.
4. A small pouch of corn starch (I made mine with a paper towel and poked a few holes in the bottom of the pouch with a pin). This can be used to prevent sticking- it may be used on your work surface, cutters or added to the fondant if it gets too sticky.
5. Food coloring (I use Americolor gels).
6. Plastic bag for fondant (keep your fondant in a sealed bag at all times or it will dry out and become unusable).
7. Plastic gloves (this will prevent your hands from becoming stained from the coloring, and helps keep your fondant as clean as possible).
8. A non-stick rolling pin (available in small and large sizes from most craft supply stores).
9. A clean, smooth work mat.
10. A lint-free dish towel (just handy to have around).
Directions ~
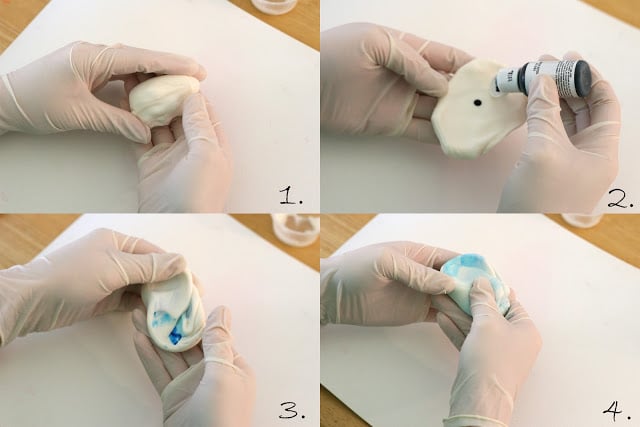
1. Remove a small ball of fondant from the plastic bag (only take out of the bag the fondant your are working on right then- fondant will dry out quickly in the air and become stiff and unworkable). Knead the ball of fondant until pliable. Rub a bit of Crisco onto your hands (or gloves), to prevent the fondant from sticking to your hands.
2. Add a drop of food coloring (this could be gel or paste- not liquid). I use Americolor brand most often.
3. Knead the coloring into the fondant. If the fondant is sticking to your gloves (or hands), add a tiny bit more Crisco onto your gloves (or hands).
4. Continue to knead until the color is fully incorporated. You may add additional color to reach the desired shade.
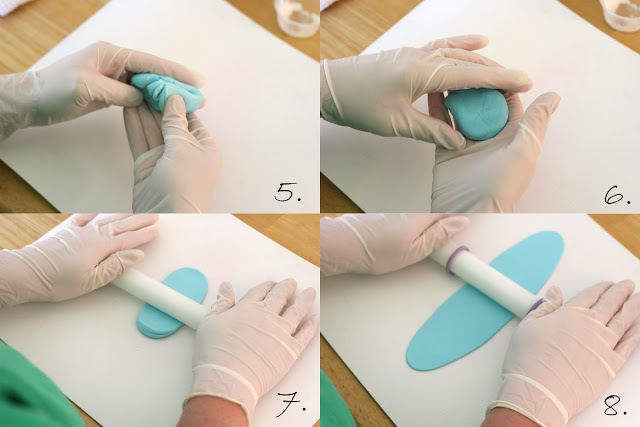
5.- 6. Continue to knead as necessary to incorporate all of the color.
7. Roll out the fondant using a non-stick rolling pin.
8. Roll to desired thickness.
(Note- If you plan to hand mold the fondant into a 3-D shape there is no need to roll it out.)
That’s it… your fondant is now ready to cut into shapes and be used as decorations on cakes, cupcakes and cookies. If you are planning to cover a cake with fondant, the coloring and rolling process is the same, only you’ll need a larger ball of fondant and a larger rolling pin.
Now you have plenty of information to get you started, if you have little or no experience with fondant. Don’t be intimidated to give it a try. Fondant can be a fun medium to work with and with a bit of practice can yield impressive results.
Helpful links and resources ~
You-Tube is a great source for videos on working with fondant. Here are links to several that I have found helpful…
How to make Marshmallow Fondant (includes recipe)
How to cover a cake with fondant
How to cover a square cake with fondant
Sources for fondant supplies ~
Michael’s
Hobby Lobby
JoAnn’s
Country Kitchen SweetArt (a great selection of fondant and baking supplies)
Jester’s Discount Cake Supply (a great source for fondant, and many fondant and baking supplies)
The Little Fox Factory (a great source for mini sized cookie cutters, perfect for simple fondant accents)



I have a g
question I’m making a three layer cake, the top two layers are for looks only
and going to be r
tossed I want to make those layers faux from Styrofoam and cover with fondant o
how far in advance can I put this together and if I cover it do you think it will stay a little ply able to add stuff later
Thank you so much for this information. I’m trying to make some graduation caps, and this is my first time using fondant. Your information has really helped and inspired me.
I just opened a cupcake business a little over a month.
Wow a great tutorial. I need to know please if i should add something to the sugar paste so when my decorations are ready lets say flowers they tend to become sticky after 1 or 2 days. I think the fondant decorations are not sticky after 2 days. By the way i come from Malta and our weather is mostly humid.This may be the cause. I wish i could do a graduation cake to perfection without the sugarpaste decorations getting sticky. Thanks a lot for your help.
Hi, where do you purchase your equpiment for the fondant flowers?
Thanks for a great and informative post. Can you tell me why I can’t use regular food coloring to color the fondant?? I haven’t tried it yet just wondering if it’s because the color is not saturated enough or because it’s too liquidy? Thanks!!
Hi Cindy, Yes, liquid food coloring would add too much liquid to the fondant and make it too moist and gummy to work with.
Hi Glory,
Thank you for your response. I made blossom flowers and tried giving them a little shape but it didn’t work very well. I left them overnight and some stayed up. Part of the problem was my fondant. I made the Michelle Foster recipe but I must not have put enough powdered sugar because the fondant was way too soft.
Vanessa
Hi, I’m a beginner to cake decorating and would like to know whether there is any additional benefit beyond saving time to making fondant decorations days prior? Do I have to make them ahead and allow them to dry? I ask because it seems like it is easier to adhere non-dried fondant to cake (e.g., with water/alcohol, etc.) than it is to apply dried fondant, which seems to require royal icing. Any advice is appreciated! Thank you.
Hi Vanessa, It depends on the design you are working on. If you are adding a shape such as a polka dot to the side of a fondant covered cake, then cutting the circles with fresh fondant and adding it to the cake while still soft is fine. If you are decorating a cake with a shape such as 3D flower, or a butterfly, they need to dry several days to keep hold their shape.
From your previous answers, I understand that fondant decorations or shaped cutouts take 1-2 days to dry. And best to use within few weeks. Does this mean that I can put them on cake (covered with fondant) within few weeks (say within 1 or 2 weeks) is fine as well?
Once I covered the cake with fondant, can I store it in fridge? Serving is on next day afternoon.
Thanks for your response. Kindly cc my email on your reply. Thank you!
In general I would not suggest to put fondant decorations in the fridge. The moisture in the fridge can cause the decorations to loose their shape, and become soft. I would always prefer to cover the cake and add any final decorations on the day it will be eaten. For an important event it might be worth a test run (maybe with a smaller version).
I have a box of Wilton pure white rolled fondant, with the silver packages unopened….. For the life of me, I can not remember when I bought it. Guessing at least 2 years ago. Should I assume it’s not ok to use, or is this stuff sorta like Twinkies? Lasts longer than we’ll ever know? I need it to make a wedding cake and I just hate throwing stuff out if I can help it…. But, also don’t want to take chances.
Hi Shannon,
First of all… I would likely never chose to use Wilton brand fondant on a wedding cake. In general, Wilton is the least tasty fondant option. Unless you were just planning to use it for accent pieces (such a small flowers and such). In general I think the life of fondant is 6 months – 1 year, although I don’t know that it really ever “goes bad” it will likely just get very hard and dry and be difficult to work with. I have been able to use older fondant in a pinch by microwaving it for a few seconds until warm enough to soften a bit. Also, you may need to work some shortening into it. Those are just my thoughts =)
Wow that was unusual. I just wrote an very long comment but after
I clicked submit my comment didn’t show up. Grrrr… well I’m not writing all that over again.
Regardless, just wanted to say great blog!