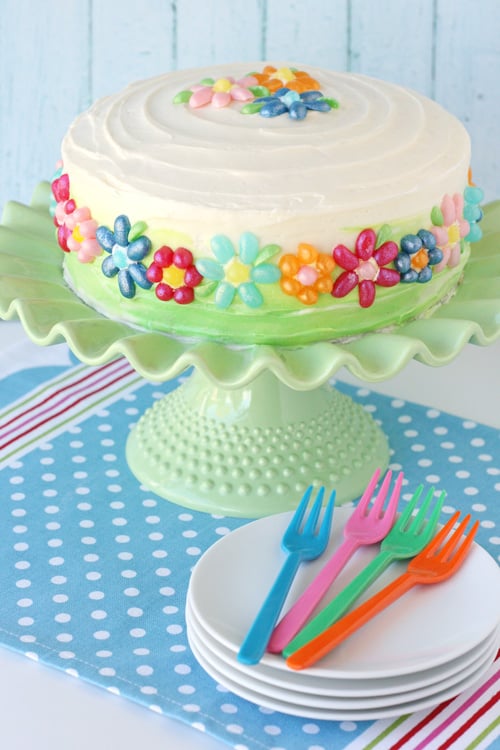
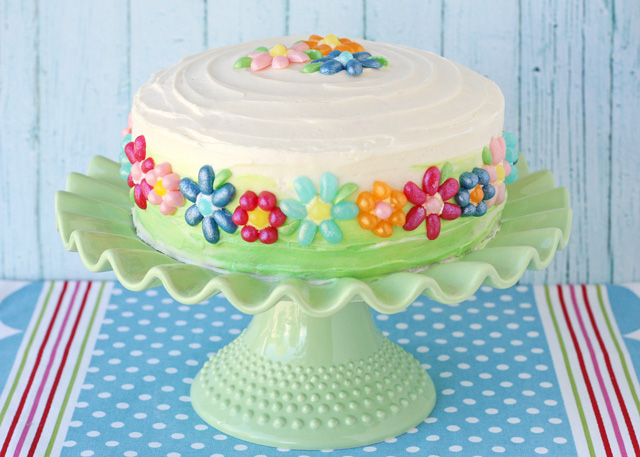
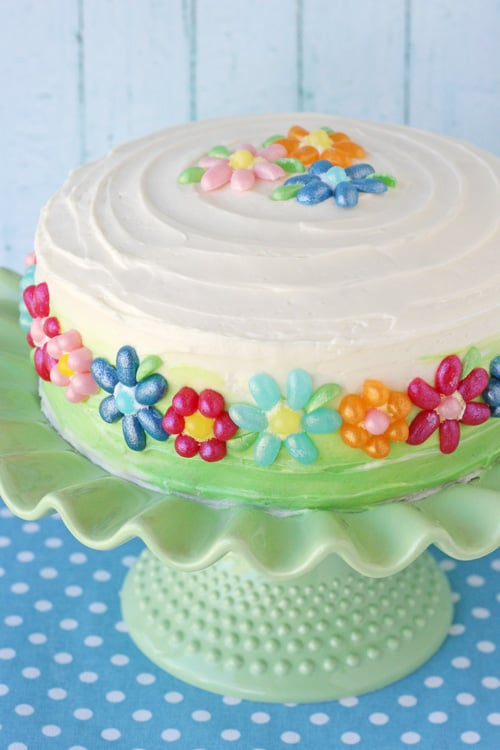
Combine cake, candy and fun colors… and this Jelly Belly Flower Cake is sure to brighten any celebration!
My family and I recently toured the (Fairfield, CA) Jelly Belly factory. It was so fun to see how these colorful and delicious little jelly beans are made! I came home from the factory with a few big bags of the newest addition to the Jelly Belly family, the Jewel Collection. These new Jelly Belly candies have a beautiful shimmery look. I was inspired to make a pretty dessert with my new “jewels” and this colorful Jelly Belly Flower Cake is what I came up with.
This cake just makes me smile, and I hope it has the same effect on you =)
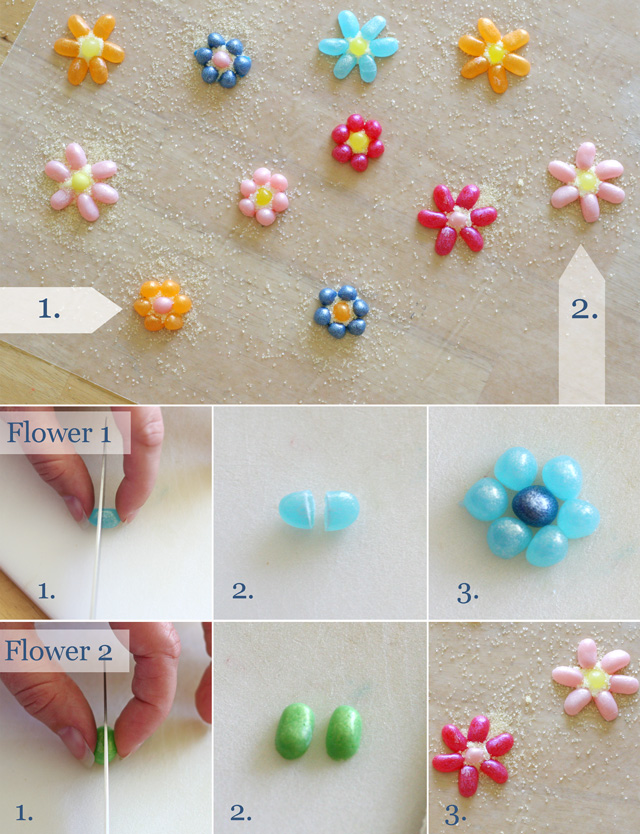
After playing around with the pretty Jelly Belly candies a bit I came up with two different flower shapes to adorn the cake. Both flowers are made from 3 and 1/2 Jelly Belly, just cut in different ways.
How to make simple Jelly Belly flowers –
Each flower shown is make using 3 and 1/2 Jelly Belly. I used a small serrated knife, and used a bit of a rocking motion to cut the Jelly Belly candies.
Flower 1 (more compact) is made by cutting Jelly Belly candies in half, across the shorter part of the bean.
Flower 2 is made by cutter the Jelly Belly in half lengthwise (as shown). The flower center for this shape is the same as the center (and petals) for Flower 1. (Disregard the sanding sugar in step three of this flower, we’ll get to that in the next set of photos.)
For each flower, cut the pieces, then just lay out the flowers as you would like, onto a piece of waxed paper. Mix and match colors as desired.
Next, attach the flower parts together, using royal icing (shown below).
I made a small batch of royal icing using 2 cups powdered sugar, whisked (in my electric mixer) with 2 tablespoons meringue powder and about 4 tablespoons warm water (yes, I know 4 tablespoons is 1/4 cup, but I like to add the water a tablespoon at a time, so it’s easiest to list it this way). Beat the ingredients together, and add a bit more water as necessary to create a thick royal icing. The icing should be about the consistency of toothpaste, not so thick that it’s too hard to squeeze from a bag, but not so thin that it just oozes out into a puddle. Put (some of) the royal icing to a small ziplock type baggie (or a plastic piping bag) and snip off the end (just a bit). Remaining royal icing should be kept covered at all times.
1. Squeeze a small dot/mound of royal icing onto a piece of waxed paper (as shown above). Place one Jelly Belly half in the center, and there should be icing all around the Jelly Belly.
2. Add the other “petals”, making sure they touch some icing.
3. Once you’ve formed the flower shape, sprinkle some sanding sugar (I used pale yellow) on top of the flower, this will hide any excess royal icing. Allow the flower to sit (with the sanding sugar on top) at least 4 hours (or more). Once the royal icing is dry, remove the Jelly Belly flowers from the waxed paper, shake off any excess sanding sugar, and use flower as desired.
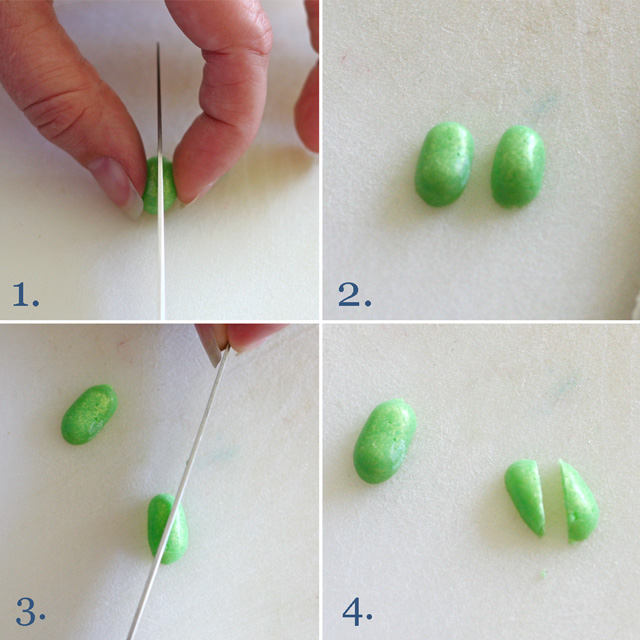
I also made some simple Jelly Belly leaves (pictured above). For the leaves I cut a green Jelly Belly in half lengthwise (images 1-2). Then cut each half at a diagonal, as shown (images 3-4). I made a bunch of leaves and just set them aside, then added them right to the cake after I added the flowers.
For the cake…
While the Jelly Belly flowers were drying I baked up an 8″ vanilla cake. For this cake I used a boxed mix, which is rare for me, but my focus on this cake was the decorating. I do have a delicious Vanilla Cake recipe which would work great as well. I divided the batter into two 8″ cake pans (oiled and floured, with parchment paper on the bottom) and baked according to the directions listed.
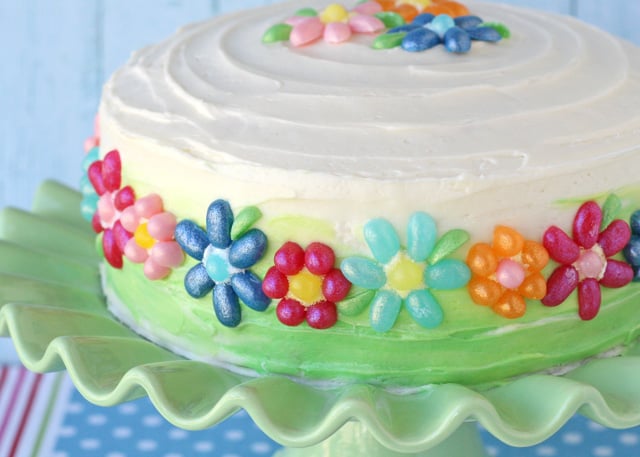
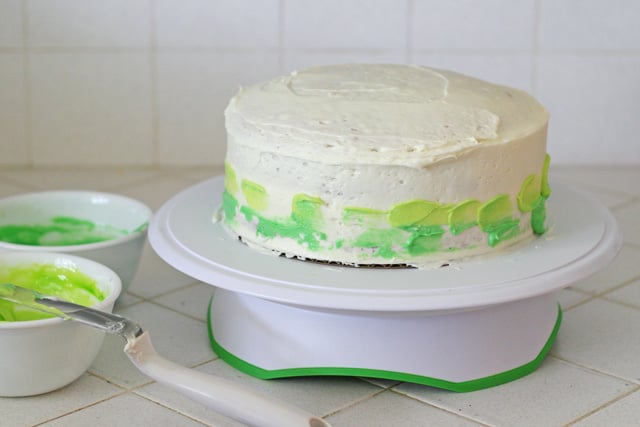
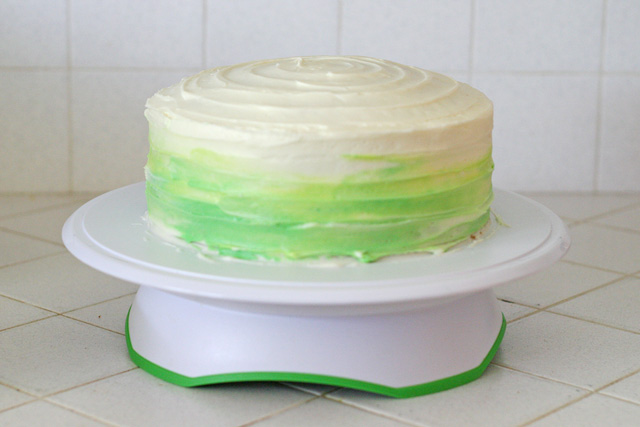
For the frosting, I made a batch of American Buttercream Frosting (with the addition of 1/2 block -4oz- cream cheese). This was the perfect amount of frosting to fill between the two cake layers and frost the outside. I frosted the cake with white (uncolored) icing, then made up two very small bowls of green icing, one using (1 drop) Americolor mint green, and one using (1 drop) Americolor Electric Green. I added a bit of the green icing along the base of the cake, then used a small off-set spatula to swirl the icing around the sides of the cake.
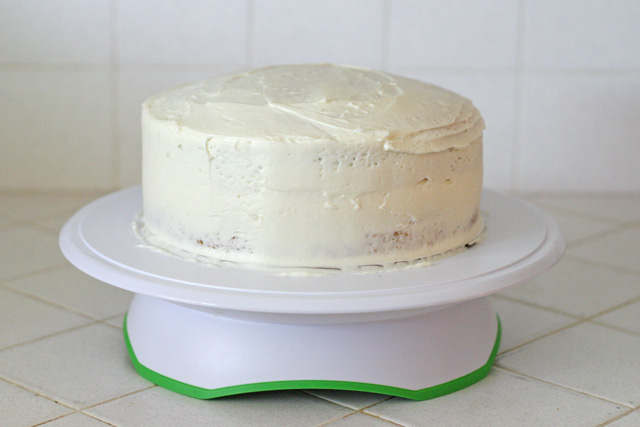
(Above) I frosted/crumb coated the cake in white frosting, then put the cake in the freezer just as shown above. The icing does not need to be perfect at this stage.
(Above) After the frosted cake has been in the freezer about 15 minutes, I added the two different colors of green icing (in dots, as shown), along the base of the cake. I also added a bit more white icing, as needed. Then, I used the offset spatula to smooth the icing on the sides of the cake, holding the offset spatula vertical.
(Above) After I smoothed the icing a bit, I added some texture by holding the offset spatula horizontally and dragging the end of the (rounded) blade through the icing (while turning the turntable). Work your way up the cake, then use the same motion to create a spiral in the icing on the top of the cake.
As soon as you’re happy with the icing (it does not need to be perfect, some texture adds to this look), add the Jelly Belly flowers as desired. I laid out the flowers ahead of time (on a piece of waxed paper) in the order I wanted to place them on the cake. Add a few leaves as desired.
This colorful cake could be a perfect farewell to summer, or used to brighten someone’s day most any time of year!
Happy baking and decorating!
How to Make a Jelly Belly Flower Cake
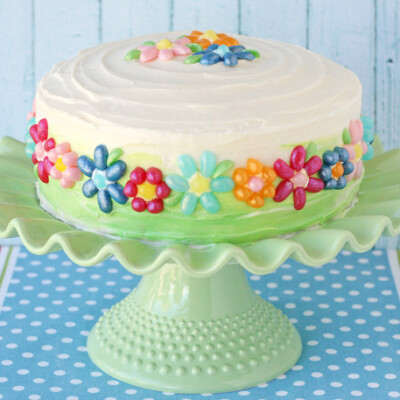
Jelly Belly Flower Cake
Ingredients
Vanilla Cake
- 2 1/2 cups cake flour
- 2 1/2 teaspoons baking powder
- 1 teaspoon baking soda
- 1 teaspoon salt
- 4 eggs
- 1 1/2 cups sugar
- 1 tablespoon vanilla extract or 2 teaspoons extract, and 1 teaspoon vanilla bean paste
- 1 cup oil vegetable canola, or extra light olive oil
- 1 cup buttermilk can be made with 1 cup milk and 2 teaspoons vinegar or lemon juice, add acid to milk and set aside for 5 minutes before use
American Buttercream
- 1 cup butter 2 sticks, salted or unsalted
- 1/4 teaspoon salt if using unsalted butter
- 4 cups powdered sugar
- 1 teaspoon vanilla extract best quality available
- 2-3 tablespoons heavy cream half and half or milk
Royal Icing
- 2 cups powdered sugar
- 2 tablespoons meringue powder
- 4 tablespoons water warm
Flowers
- 40 Jelly Beans
Instructions
Vanilla Cake
- Preheat oven to 350*F.
- Prepare cake pans (line the bottom of the pans with parchment paper, butter and flour the sides of the pans)
- In a medium bowl, add cake flour, baking powder, baking soda and salt. Stir together with whisk, and set aside.
- In the bowl of an electric mixer, add eggs and beat 10-20 seconds. Add sugar and continue to beat on medium speed about 30 seconds. Add vanilla and oil, beat.
- Reduce mixer speed to low and slowly add about half of the flour mixture. Add half of the milk, then the rest of the flour and the rest of the milk. Beat until just combined. Scrap down the side of the bowl.
- The batter will be thin. Pour batter into prepared cake pans.
- Bake cakes until cake is slightly domed, and a toothpick inserted in the center comes out with only moist crumbs, no wet batter. Depending on the size pans you use (6″, 8″ or 9″), the baking time will vary between 22-30 minutes.
- Cool cakes about 10 minutes in pans, then remove from pans. Wrap warm cakes in plastic wrap, then aluminum foil and place in freezer about 20 minutes. This will help them cool fully, but stay nice and moist.
- Frost as desired when fully cool.
American Buttercream
- In the bowl of an electric mixer, fitted with the whisk attachment, beat butter (on medium speed) until completely smooth (30 seconds to a minute).
- Add salt (if needed).
- One cup at time, add 2 cups of powdered sugar, beating after each addition.
- Add vanilla, or other flavorings and beat to combine.
- Add about 1 tablespoon of cream, and continue beating.
- Add the remaining 2 cups powdered sugar, one at a time.
- Add an additional 1-2 tablespoons cream until desired consistency is reached. If you want to pipe the frosting on cupcakes, the frosting should be nice and thick. Continue to beat another minute or so. The frosting should now be smooth and fluffy.
Royal Icing
- Beat the ingredients together, and add a bit more water as necessary to create a thick royal icing.
- The icing should be about the consistency of toothpaste, not so thick that it’s too hard to squeeze from a bag, but not so thin that it just oozes out into a puddle.
Flowers
- Each flower shown is make using 3 and 1/2 Jelly Belly. I used a small serrated knife, and used a bit of a rocking motion to cut the Jelly Belly candies.
- Squeeze a small dot/mound of royal icing onto a piece of waxed paper (as shown above). Place one Jelly Belly half in the center, and there should be icing all around the Jelly Belly.
- Add the other “petals”, making sure they touch some icing.
- Once you’ve formed the flower shape, sprinkle some sanding sugar (I used pale yellow) on top of the flower, this will hide any excess royal icing. Allow the flower to sit (with the sanding sugar on top) at least 4 hours (or more). Once the royal icing is dry, remove the Jelly Belly flowers from the waxed paper, shake off any excess sanding sugar, and use flower as desired.
Nutrition
Prop notes –
Colorful forks – Available from Shop Sweet Lulu.
Green cake stand – Purchased Spring 2013 at Costco, no longer available.
Disclosure – I was compensated by Jelly Belly with products and/or payment to create this post, but all text, images and ideas are my own.

You are soooo talented.
Ah, so pretty!! Love the attention to detail and going the extra mile to cut the beans and arrange them into flowers seems well worth the effort! 🙂
Hi there. I am very new to baking actually (infact the reason I wanna learn baking is to be able to make excellent cake when my baby daughter turns one next year). I came across your page and I just love how you have explained stuff. I love your work, your photographs as if I just wanna take a bite of each one of your cakes. The best part is how you make everything so simple by explaining each and every detail. I m just in love with this cake, your red velvet cake and the chocolate cupcakes and the cream cheese icing and i’ll share pics and links with you when I make my own cakes since you happen to be my biggest inspiration :). Thanks and keep up the amazing work you’re doing.
Very pretty cake-screams happy to me! Thanks!
This cake is absolutely beautiful! Wish I was that talented….. I love your cakes and have made a couple of them but they never look like yours… 🙁
Your cake is beautiful and I just love your photo. Is that a real wall or a backdrop? I have such a hard time photographing cakes
Thanks! The background is a photography backdrop I purchased from Ink and Elm (online).
Beautiful Cake! I love it!
Thanks Robin! You always do such gorgeous and creative cakes yourself!!
This is gorgeous! I still can’t believe I’ve never done the tour there. We went once but just toured the gift shop.
Yes, I’m sure mini you would love it!
I love this. It is so simple and elegant all at the same time. This is truly beautiful.
I love this cake so much! It definitely makes me smile to see it. So so lovely!
I’ll have to make it for one of my girls’ birthdays. 🙂
Thanks so much! I bet your kids would love helping assemble the flowers (if you do the cutting).