Last week I shared how to make pretty fondant flowers, and promised to show how to use them soon. Well, here I am, as promised!
This past weekend my family and I enjoy attending a big luau party at a friends house. We have enjoyed friendship with the host family about 10 years, and most every one of those years they’ve hosted a huge, beautiful luau party. For the past several years I have had the pleasure of making special desserts for the party.
Two years ago I took the time to photograph the whole set-up, here is the Lange Luau 2010 (along with some photos of the incredible yard the party is held in).
This year, I didn’t photograph everything together, but I have broken the desserts into several different posts, to show you each special dessert.
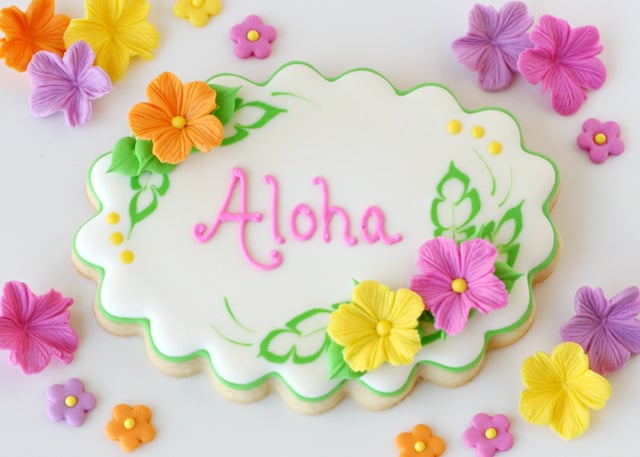
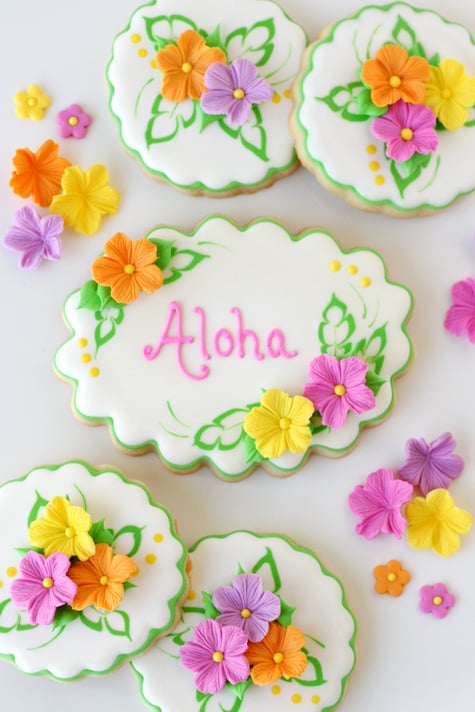
Of course decorated cookies need to be included! Since I have made cookies for this party for several years, I try to come up with some slightly new designs each year. I have several designs to share (some will be in future posts), but today I’ll start with my favorites! In fact, these may be some of my favorite cookies ever!
Would you like to make some pretty Luau Cookies?
First, you’ll need a batch of cookies made with my Sugar Cookie Recipe.
Next, prepare a batch of royal icing (here’s my Royal Icing Recipe).
I’ll use the following terms to describe the icing consistency for each step…
Thick/piping consistency– This icing stays in place when piped, and does not settle into a pool. This is a bit thicker than the consistency of traditional toothpaste.
Medium consistency– This is just thick enough to stay in place when piped, but thin enough to settle into a pool after a few seconds. When mixing this icing, draw a line with a spoon through the bowl of icing, and the line should heal (disappear) in 12-15 seconds. This is about the consistency of shampoo.
Thin/Flood consistency– Slightly thinner than medium consistency. This is good for filling in large cookies quickly.
Let’s get started!
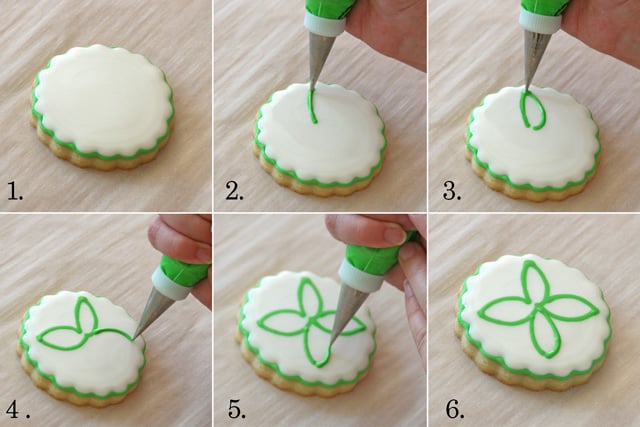
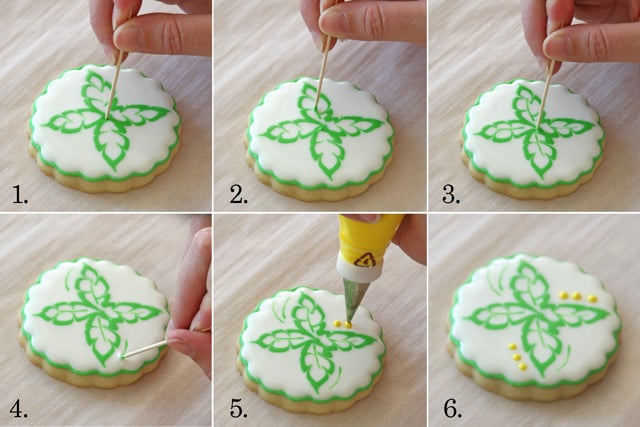
1. Outline your cookie (I used a scalloped circle) with green icing (in either a thick or medium consistency), using a #2 or #1.5 tip. Allow outline to set up (15 minutes or more), then fill in/flood the cookie with white medium (or flood) consistency icing.
2.-6. Once the cookie is filled in, immediately, draw simple leaf shapes using green, medium consistency icing (using a #2 or #1.5 tip).
Quickly, continue below…
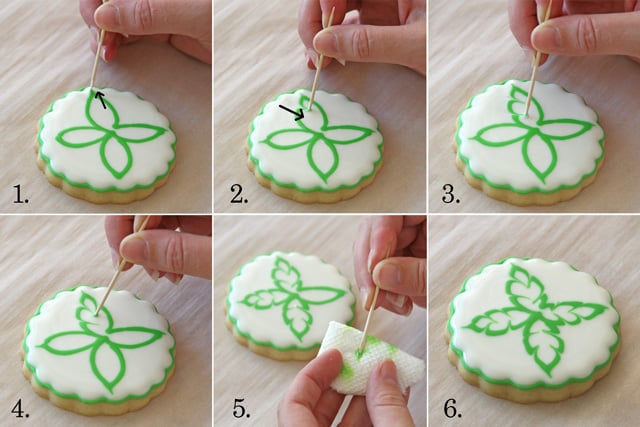
1. Working quickly, while the icing is still wet, use a toothpick to draw from the inside of each leaf, out toward the tip, creating a little point at the top of each leaf shape.
2.- 4. Now, drag your toothpick in the opposite direction (from the outside of the leaf, toward the inside), around the edges of the leaf, creating jagged edges.
5. Throughout the process, use a slightly damp cloth or paper towel to wipe off your toothpick between each drag on the cookie.
Quickly, continue below…
1.-2. Continue, while the icing is still wet…. Dip your toothpick into an area with green icing, then use that icing to add a thin green “vein” up the center of the leaf.
3.-4. Again, dip your toothpick in an area with some green icing, then drag your toothpick to create a few flourishes, as desired.
5.-6. Add a few yellow dots (if desired), using yellow, medium consistency icing. Now, allow the cookie to dry.
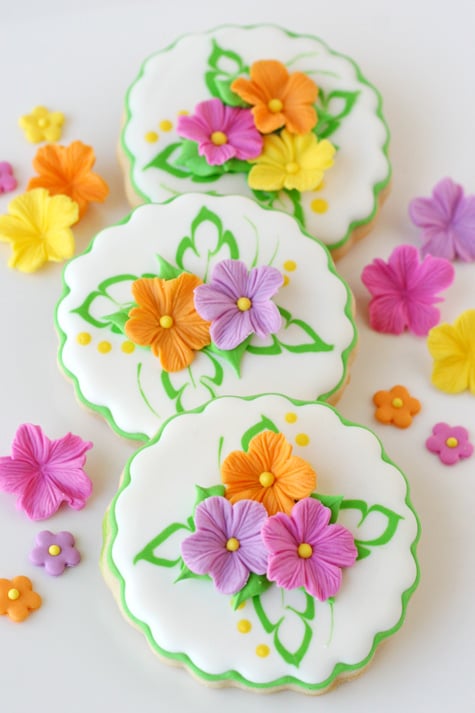
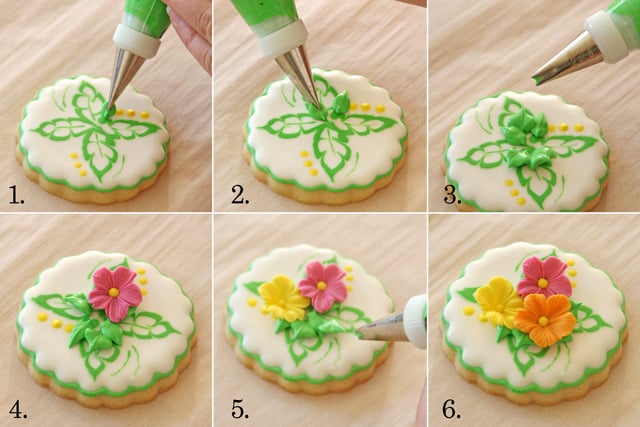
1. Once the cookie is dry (2-8 hours), add 3-D leaves. I used a #352 Wilton tip. Feel free to use any leaf tip you prefer.
2.-3. Add a few leaves, using green, thick consistency icing.
4.-6. Add (dry) fondant flowers, as desired. Adding a few leaves in between, as needed.
Allow the cookie to dry fully before packaging (4-8 hours).
Here is the direct link to my post on How to Make Fondant Flowers, as I used here.
Feel free to use royal icing flowers (Sweet Sugar Belle has some nice tutorials HERE and HERE).
Or purchase pre-made gumpaste, fondant, or royal icing flowers.
Especially if you make your own fondant flowers (as I did), these cookies will be a bit time consuming. But a few extra detailed cookies in a collection with other, simpler designs can create a really beautiful display! Because of the 3-D flowers, these would need to be packaged gently (if at all) and thus, would not be ideal for shipping.
I’d be interested in your feedback on this set. Do you like me sharing more complex designs from time to time, or do you prefer simpler designs?
Happy Decorating!
*Supply note- The large, scalloped oval cookie cutter I used for the “Aloha” cookie is from Copper Gifts. The scalloped circle cutter is from Cost Plus World Market (in store).

These are gorgeous, Glory! I love how you did the wet-on-wet leaves!!! I’m working on a flower set this week and will definitely incorporate your ideas into the set. Thank you for sharing!
Christine (Sugar Cravings)
BEAUTIFUL!!!!!! I wish I was so talented.
I’m in love with these colors…so pretty!!
I loved the tutorial on the flowers you posted earlier and now that I see this beautiful cookie, I know that I will be buying the tools needed to make these flowers. thanks for the detailed instructions that you post in your tutorials.
wow, it looks so good! Amazing cookies, great work!
kisses and best wishes :*
Awww some of the prettiest cookies I’ve ever seen! 🙂
Just one word,, WOW.
I was thinking to make flower cookies this week..
I love these!! They are like pure sunshine in cookie form!
These cookies are beautiful! Love the flowers!
Oh my goodness, those leaves! The flood leaves…that look just like palm leaves!!! BRILLIANT!!!!!
Thanks Lizy! I’m such a fan of yours, so that means a lot coming from you!! <3