Candy canes and peppermint candies are a classic Christmas treats. These iconic candies were the inspiration for these “sweet” Christmas cookies. Traditional colors of red, white and green are the only colors needed to create a whole set of peppermint inspired cookies.
I added an extra little “twist” to these cookies, by starting with delicious Chocolate Sugar Cookies.
I used my Chocolate Rollout Cookie Recipe, then decorated the cookies with Peppermint Royal Icing (recipe below).
For decorating, I use the terms “outline consistency” and “medium/flood consistency”. Outline consistency icing should be thick, but not so thick it hurts your hand to squeeze out of the bag – about the thickness of traditional toothpaste. Medium/flood consistency should be just thin enough that it will flow and flatten, to fill in a given area – about the thickness/consistency of corn syrup.
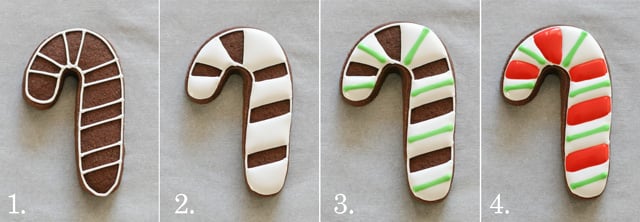
Candy Cane Cookies ~
1. Using white (outline consistency) icing, outline the candy cane shape, then add stripes as desired. I like to plan that the white areas will be slightly larger than the red areas.
2. Fill in every other space with white (medium/flood consistency) icing.
3. If desired, immediately add a stripe of green icing onto the white areas. If you want you candy canes to only be white and red, simply skip this step.
4. After the white areas have set up a bit (30 minutes or so), fill in the open spaces with red (medium/flood consistency) icing.
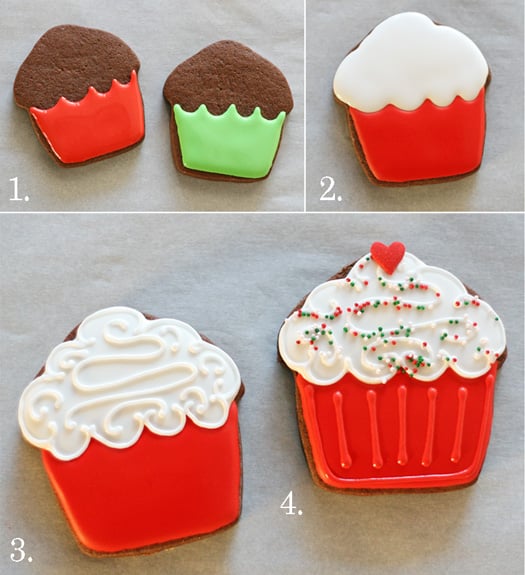
Cupcake Cookies ~
1. Outline and fill in the base (the “cupcake liner”) of the cookie with desired color.
2. When the base area has set up a bit (30 minutes or so), fill in the top (“frosting” area) with white icing.
3. Add icing swirls with white (outline consistency) icing.
4. Immediately add sprinkles, by holding the cookie over a paper plate and sprinkle with desired sprinkles. If the bottom half (in this case the red area) is still wet, be careful not to get any sprinkles on that area. Add a large heart sprinkle on top, if desired. Add red detailing on the “cupcake liner” portion of the the cookie, as shown.
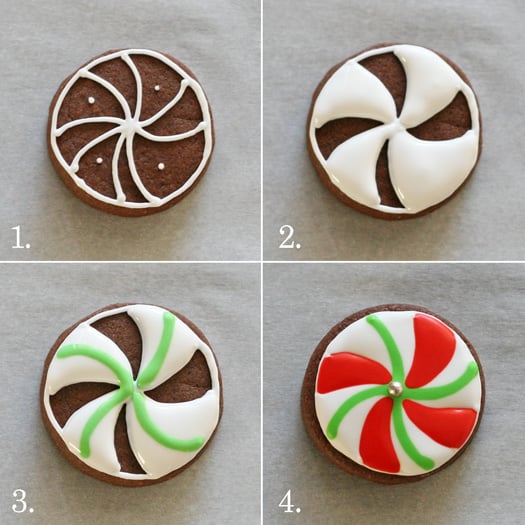
Peppermint Candy Cookie ~
1. Outline the design, as shown, using white (outline consistency) icing. I usually add a tiny white dot as I’m working, to remember which area will be white, and which will be red, so I make sure to create the right number of spaces.
2. Fill in every other space (as shown).
3. Immediately add a green stripe in the white areas.
4. After the white areas have set up a bit (30 minutes or so), fill in remaining spaces with red icing. Add a silver dragee in the center of the cookie (if desired).
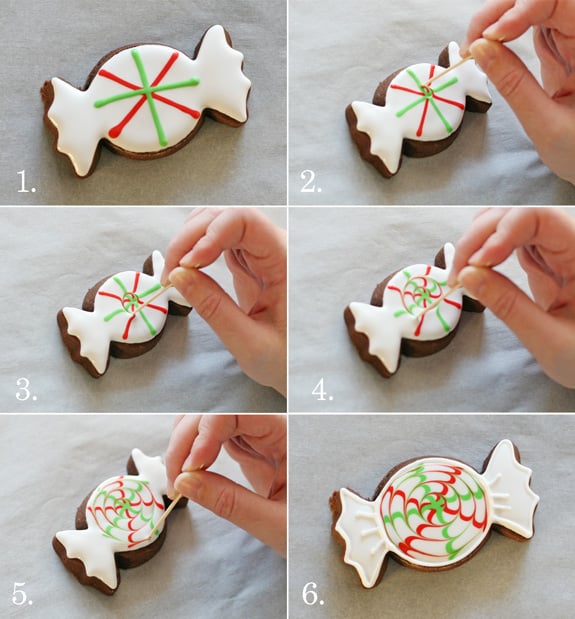
Wrapped Peppermint Candy Cookie ~
1. Outline and flood cookie with white icing. Immediately, add lines of red, then green icing (as shown).
2.-5. Starting in the center of the cookie, drag a toothpick in a spiral motion, working your way to the outside edge of the “candy” area of the cookie (as shown).
6. When your icing has set a bit (30 minutes or so), add finished details with white icing, by outlining the shape, and adding little lines where the “wrapper” would be cinched together.
Once your cookies are decorated, I have several pretty packaging ideas HERE and HERE.
In additional to these Chocolate Peppermint Cookies, I have an extra treat for you today! I’ve teamed up with a few talented bakers and bloggers, who are also sharing cookie recipes and ideas today!
Follow the links below for more holiday cookies ideas!
Jenn | Hostess with the Mostess
Carrie | Half Baked :: The Cake Blog
Marian | Sweetopia
Kim | The TomKat Studio
Jessica | Pen N’ Paperflowers
How to Make Peppermint Royal Icing

Peppermint Royal Icing
Ingredients
- 4 cups powdered sugar
- 5 tablespoons meringue powder
- 6 tablespoons warm water filtered if possible
- 3/4 teaspoon peppermint extract
- 1 tablespoon light corn syrup optional
Instructions
- Add powdered sugar to the bowl of your electric mixer. Add meringue powder, then mix for a few seconds on low.
- Add warm water, one tablespoon at a time, while the mixer is running.
- Add peppermint extract.
- Add corn syrup (if desired).
- Continue to mix, stoping the mixer to scrap down the sides of the bowl, if necessary.
- Increase speed to medium/high and beat icing 1-2 minutes.
- This recipe will give you a very thick icing. Add additional water as needed, depending on the project.
- Keep icing covered (with plastic wrap) at all times.
- Use smaller bowls to color icing, or thin down icing, as needed.





What do you use to make the icing so thin? I’m new at this. Is there a special tool for that?!
Hi Dina,
I’m not sure if you mean make the icing a thin consistency (so it flows easily), or a thin/fine line, so I’ll answer both.
To get a thin consistency (as needed to fill in the cookies), simply add small amounts of water to the base recipe (listed in the post above, but I’ll add the link for you here as well) –> https://www.glorioustreats.com/spring-cupcakes-with-cookie-toppers/
If your question was in regards to how to create thin details, that has to do with the size of piping tip on the icing bag. Refer to the blog post I just linked to and you’ll see the basic steps and supplies needed for cookie decorating. Generally I use a #2, #1.5 or #1 sized tip for all of my decorating. The smaller the number, the smaller the hole in the tip.
Let me know if that’s answered your question or not.
Happy decorating!
hi,glory. thanks for the reply..
these are so cute, i love your work… i just have a question…is there another way to make royal icing if i cant find any meringue powder?
Hi Ann, Yes, you can make royal icing with dried egg whites, or fresh egg whites, or store bought pasteurized egg whites. Do a google search for “making royal icing with egg whites” and I’m sure you’ll find a recipe. Happy baking!
These are the BESt cookies and so easy to work with. I just made them for St. Patrick’s Day. They taste like Girl Scout Thin Mints! Yummy! As a side note, I used Godiva Chocolate Liqueur , so good! Thank you so much for your posts ~ I’ve learned how to do cookies just by reading your blog!
What cookie cutters did u use?
Each of the cutters I used are the shape you see (I didn’t handcut any of these shapes). I dont’ know where I bought each cutter, but I know the wrapped candy shape is from Foosecookiecutters.com
love the swirly effect on these.!