The BEST Sugar Cookies
Sugar cookies are synonymous with the holiday season, but really, they’re great ANYTIME of the year. The key is getting a really good sugar cookie recipe, and this one is the BEST! There are a few things that make this the best sugar cookie recipe:
- perfect cutouts every time – the dough really holds it shape!
- the cookies are flat, not poofy, which makes them easy to decorate
- superior flavor and texture
- little to no spread – the cookies don’t spread or flatten while baking
A classic cookie like a sugar cookie needs to be able to stand on its own and have great texture. Adding icing and decorations is great when you want to get festive, but you want a recipe that doesn’t need to hide behind those things to be enjoyed.
This recipe was actually the second recipe I ever posted on my site… way back in 2010 and it’s definitely withstood the test of time. Truly the most PERFECT Sugar Cookie Recipe ever!
As we head into a busy holiday baking season I thought it was the perfect time to show off this tried and true favorite! This is the recipe I’ve used for most all of the pretty decorated cookies I’ve shared over the years and it’s truly the best sugar cookie recipe ever!
PIN IT NOW to save for later!
Sugar Cookie Variations To Try
This Sugar Cookie Recipe is delicious as is, but is also a great base to play around with extra flavor!
Here are a few of my favorite variations…
- Orange Zest Sugar Cookies
- Sprinkle Sugar Cookies (and a Christmas version)
- Coconut Cutout Cookies
- Pumpkin Spice Cutout Cookies
- Chocolate Cutout Cookies
Sugar Cookie Ingredients
Any good cookie is a product of good ingredients. Here’s what goes into this recipe.
- Unsalted Butter: Using a good quality, unsalted butter allows you to have more control over how much salt is in your recipe.
- Sugar: You will need granulated sugar for this recipe.
- Egg: A large, room temperature egg is the key to success.
- Vanilla Extract & salt: They just make everything taste better.
- Baking Powder: Helps create a soft cookie that keeps its shape and has just the right amount of rise.
- Flour: All-Purpose flour is what you want for these cookies.
How to Make Homemade Sugar Cookies
I’ll walk you through my process for making perfect cut-out cookies, and then there is a full printable recipe at the end of this post.
-
Prepare the cookie dough.
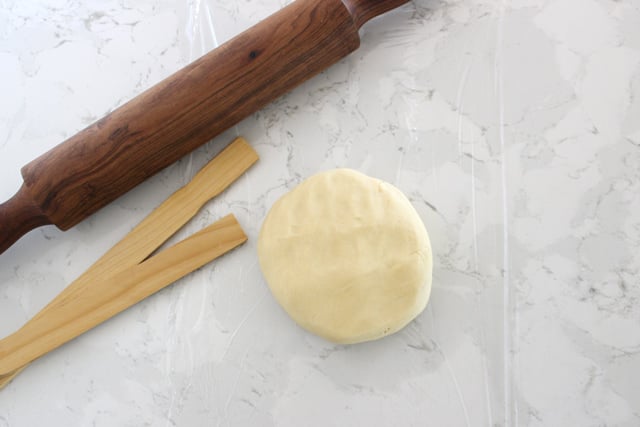
Prepare the dough as directed (in the recipe below). Lay out a large piece of plastic wrap onto a clean, smooth counter. If you have tile counters, you can do this on a large cutting board or marble slab. Grab about half of the finished dough from the bowl and knead by hand just a bit to create a nice smooth ball. Set the ball of dough on top of the plastic wrap, and press down to flatten a bit.An alternative to rolling the dough out on plastic wrap would be to lightly flour your work surface, and roll out the dough directly on the floured counter. I’ve done this many times successfully, but the updated process I’m showing in this post is simpler, neater and the finished cookies are generally smoother (because little bits of flour and extra pockets of air are not added during the rolling process). My original Sugar Cookie Recipe post shows the more traditional method if you prefer.
-
Roll out the sugar cookie dough.
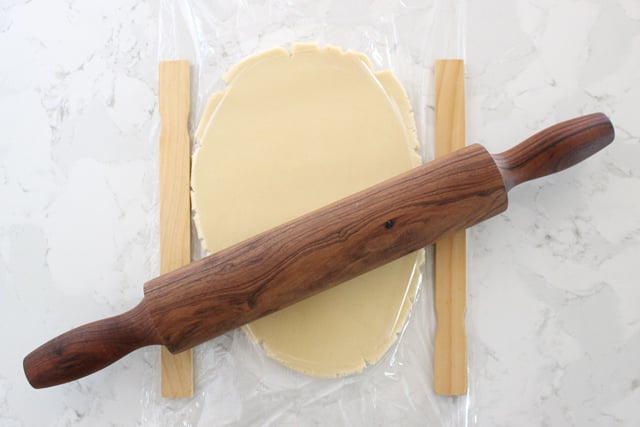
Lay a second piece of plastic wrap on top of the dough, minimizing the creases and wrinkles. I use a homemade version of perfection strips to roll the dough into a perfectly even thickness. (I’ve since invested in this adjustable rolling pin and rolling out cookies have never been so easy!) My sticks are simply two paint stir sticks glued together, so I’m using a total of four stir sticks (one double-thick stick on each side of the dough). Place the sticks on either side of the dough (on top of both layers of plastic wrap) and begin to roll out the dough to the thickness allowed by the sticks. Move the sticks as needed, and vary the direction of your rolling as needed, until the dough is smooth, flat and one consistent thickness.
-
Transfer the dough to a baking sheet to chill.
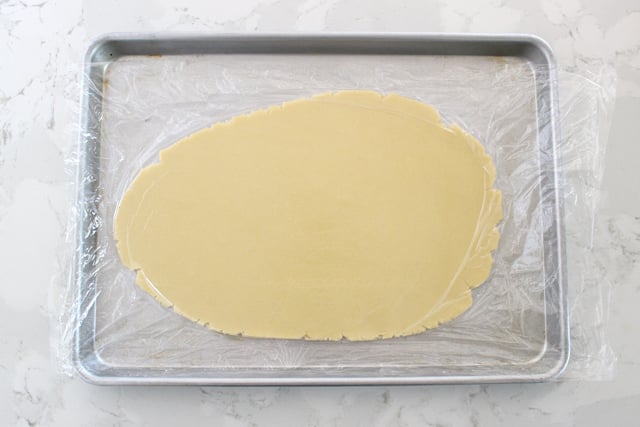
Pick up the slab of dough (enclosed between the two layers of plastic wrap) and move to a large baking sheet. Place the baking sheet in the freezer for 5 minutes (or fridge for 10-15 minutes). Chilling the dough makes it much easier to cut out. The chilled dough will not stick to the cookie cutters, and the cookies will keep their shape as you move them to the baking sheet.
Do not leave the dough in the freezer too long or it will be too firm to work with. If you do leave the dough in the freezer too long, simply place the slab of dough at room temperature a bit (maybe 15 minutes) until it’s softened just enough for a cookie cutter to cut the dough.
-
Cut out shapes.
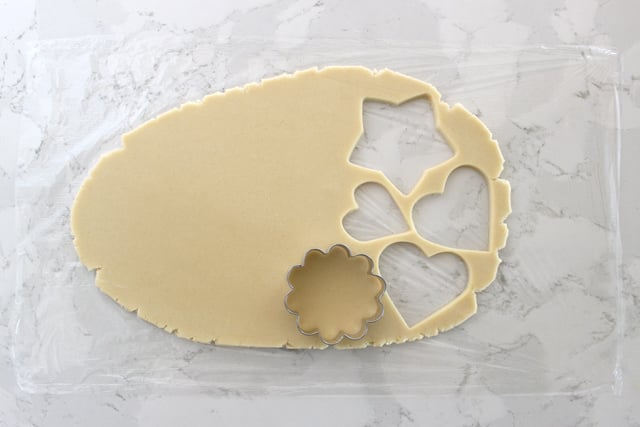
Cut out your desired shapes. Use the dough in an orderly way, working from one side to another, fitting in various shapes so you are creating as few “scraps” as possible. Once you’ve cutout as many shapes as you can on the slap of dough, roll the scraps into a ball, and roll out again just as you did before (starting back at step number one). You can re-use the same plastic wrap.
-
Chill cookies one final time.
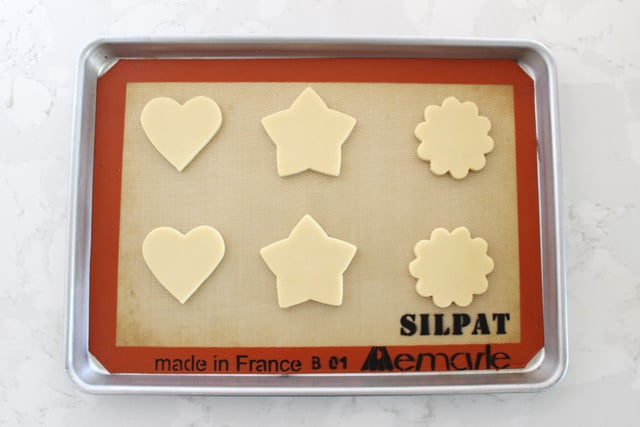
Place cutout cookies onto a baking sheet lined with parchment paper or a Silpat type liner.Place similar size cookies on a single baking sheet (do not bake large and small cookies on the same sheet). Allow cookies about 1″ of space between cookies. My preference at this point is to place then entire baking sheet of cut out cookies back in the freezer for about 5 minutes. This will ensure nice flat edges around your cookies, and they will hold their shape perfectly.
-
Bake cookies.
Bake cookies in a pre-heated oven (do not place in oven until it’s reached the proper temperature). Use good quality baking sheets (heavy, with no non-stick coating) for the best results (the most even baking).
-
Let cookies cool before decorating.
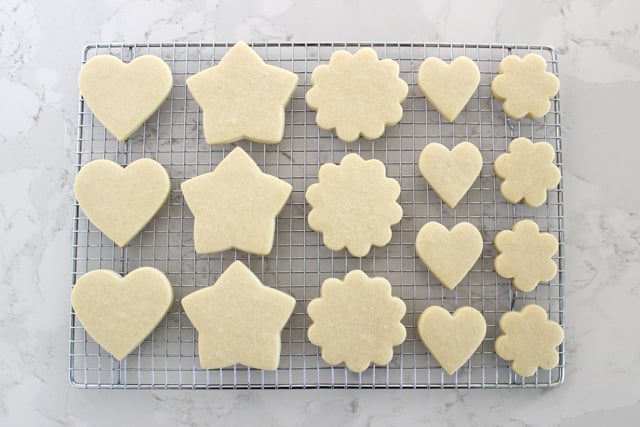
Allow cookies to cool for a minute or two on the baking sheet, then move to a wire cooling rack. My favorite spatula ever for moving the cookies without breaking them is this thin metal spatula. Allow cookies to cool fully before decorating.
If you do not plan to decorate on the day they were baked, move cookies to a large tupperware type container, layer with parchment paper between layers of cookies. Cookies can be stored in an airtight container at room temperature up to a week.
If you do not plan to decorate the cookies within a week, place entire container of cookies (sealed well, and with parchment paper between layers of cookies) in the freezer and freeze for up to a couple months. Allow frozen cookies to come to room temperature before decorating.
Tips for Making Perfect Sugar Cookies
- Use Room Temperature Butter. Your butter should be soft enough that your finger leaves a little imprint if you press on it, but not so soft that your finger goes through the butter.
- Don’t Mix the Dough Too Much. Over mixing the dough after adding the flour can cause it to develop gluten and make the cookies tough, which is NOT what you want.
- Use Good Quality Baking Sheets. Bake your cookies on good quality baking sheets (heavy, with no non-stick coating) for the most even baking and best results.
Sugar Cookie Recipe FAQs
Sugar cookie recipes, while simple, involve a little more patience and precision than drop-style cookie recipes. That can lead to questions. Here are the most common questions and their answers for making terrific cookies, every time.
- Decorating Prep and Storage. If you do not plan to decorate on the day they were baked, move cookies to a large tupperware type container, layer with parchment paper between layers of cookies. Cookies can be stored in an airtight container at room temperature up to a week. If you do not plan to decorate the cookies within a week, place the entire container of cookies (sealed well, and with parchment paper between layers of cookies) in the freezer.
- Can This Sugar Cookie Recipe be Frozen? Yes! When sealed well and separated by a layer of parchment paper, these cookies can be frozen for up to a couple months. To thaw, simply let them sit on the counter and come to room temperature. If you want to decorate them, allow frozen cookies to come to room temperature before decorating.
- Frosting and Icing. Once you have your perfect sugar cookie cut-outs, you can enjoy a couple warm out of the oven while you mix up an icing of your choice! You can make this Simple Butter Frosting if you’d like something quick, easy and delicious to put on your cookies! Or if you’d like to do some more detailed decorating, mix up a batch of Royal Icing.
More Christmas Cookies To Try
- Hot Cocoa Cookies
- Spritz Snowflake Cookies
- Christmas Sprinkle Cookie Bites
- Cranberry Orange Cookies
- Snickerdoodle Cookies
- Watercolor Snowflake Cookies
- Winter Wonderland Cookies
- Chocolate Peppermint Biscotti
How to Make Perfect Sugar Cookies

Perfect Sugar Cookies
Ingredients
- 3 cups all-purpose flour
- 1 teaspoon baking powder
- 1/4 teaspoon good quality salt
- 1 cup Challenge unsalted butter 2 sticks, room temperature
- 1 cup sugar
- 1 large egg
- 1 teaspoon good quality vanilla extract see flavor options in notes
Instructions
- In a medium bowl, stir together the flour, baking powder and salt, and set aside.
- In the bowl of an electric mixer, using the paddle attachment, cream together the butter and sugar until light and fluffy. This should take 2-3 minutes.
- Add the egg and vanilla and beat another minute or so.
- Add the flour mixture slowly. (Be careful not to add too much at a time or you will have a snowstorm of flour.)
- Blend until all of the flour is incorporated. The mixture will look crumbly at first but just keep blending until the dough begins to pull away from the sides of the bowl.
- Remove about half of the dough from the bowl and knead by hand just a bit to form a smooth ball. Roll out dough onto a lightly floured work surface, or onto a piece of plastic wrap (as described in detail in the blog post above).
- Cut out cookies into desired shapes and place entire baking sheet of unbaked cookies into the freezer for 5 minutes.
- Preheat oven to 350°F and bake cookies in preheated oven for 9-11 minutes, depending on the size and thickness of your cookies.
- The cookies are baked when then are no longer shinny on top, but they will not show much of any change in color.
- Cool on baking sheet just a minute or so, then carefully move to a wire cooling rack and allow to cool fully before decorating.
Notes
Nutrition
PIN IT NOW to save for later!
Once you have your perfect sugar cookie cut-outs, you can enjoy a couple warm out of the oven while you mix up an icing of your choice!
You can make this SIMPLE BUTTER FROSTING if you’d like something quick, easy and delicious!
Or if you’d like to do some more detailed decorating, mix up a batch of ROYAL ICING.
I think that once you try this recipe, you’ll agree that it’s simply the PERFECT sugar cookie recipe!
Happy baking!
Disclosure – Shopping links to specific supplies provided for your convenience. I may receive a small commission from purchases made using these links, at no additional cost to you.




I have tried many sugar cookie recipes and have to say this is my absolute favorite! I followed your instructions carefully and it worked up just beautifully!! We will decorate them tomorrow, but they do taste great – as a sugar cookie should, wanting some lovely icing to add a little sweetness. Thank you for your detailed instructions and wonderful recipe!
I’d likely agree… as this recipe is really designed to include icing of some kind. If you plan to make them plain (without any icing or glaze) I’d be sure to add some additional flavoring, such as a bit of almond extract, some citrus zest, etc. There are several variations listed at the beginning of this blog post.
mash up a banana with a tablespoon or 2 of water. great substitute for eggs (used to be a pretty strict vegan but couldn’t keep it up so props to you)
Hi Karen, It sounds like it just might not be fully mixed. Are you using a large stand mixer or smaller hand mixer? If using a hand mixer, you may have to do some extra kneading by hand to make sure the dough is smooth and all ingredients are combined, before chilling the dough. If using a large stand mixer, it should do the work for you… keep mixing until the dough is smooth and pulls away from the sides of the bowl.
I found the dough to be very crumbly and difficult to work with. I am still in the process but so far I have only had some luck with round shapes. The snowflakes just keep breaking.
They do taste really good though.
Hi Ellen, So sorry you’re having trouble. I’ve made the recipe hundreds of times… but that might be a disadvantage here because I’m super familiar with it. Sometimes it’s hard to help without being with you in the kitchen. At what stage is the dough falling apart, while it’s still raw dough, or the baked cookies? Did you use a large stand mixer to mix the dough? It is much more difficult to form a smooth dough without a large stand mixer, but it is possible… it just requires a bit more kneading. Are you rolling the dough between plastic wrap? If the cookies are breaking AFTER their baked, then they might just need to cool a bit longer on the baking sheet before you move them. Let me know a few more details and I’ll see if I can think of any other suggestions.
Hi Kristen,
I’m sorry to say, I’m truly stumped! I have made this recipe literally hundreds of times successfully. The only time I have ever seen or experienced any issues is if the recipe is being made without a large mixer, or the dough is simply not mixed until fully smooth and combined… but it sounds like that’s not the issue. The only time I have a cookie break after being baked is if I try to move it from the baking sheet while it’s still super warm. Are you sure you used two sticks of butter? I’m sorry I really can’t think of anything else that might be causing this issue.
I have also had the same problem with them being very crumbly. Wonder what we are doing wrong?
At what stage are they crumbly? The dough itself, or the baked cookie? Neither stage should be crumbly. If it’s the dough itself, then are you using a large stand mixer? You’ll have best results with that. The dough can be made with a smaller mixer, and then kneaded by hand toward the end, but that will be quite a bit more difficult. Describe the issue you’re having a bit more and I will try to give you some ideas.
I have had this issue as well.
Once I have added the flour to the butter/sugar mix, it comes together but it remains as a crumb texture and will not bind together. It still feels a little gritty with sugar, even though I allowed it to beat until it was creamy/fluffy once the eggs and vanilla were added in.
I have mixed it up in my large stand mixer, and left it to keep mixing as per your suggestion in the recipe; to no avail. I then tried to knead it a little by hand but it remains crumbly.
I’m not sure if it is due to the fact that I am in Australia and if our “1 cup” measurements are different for the sugar.
Thanks- Im going to make these!
Beautiful
I saved your recipe some time ago and I make these fabulous cookies ever since. They always turn out spectacular. I love everything you post here. Thank you!
I love these! They look so crispy and buttery I have to try it 🙂
I would love to try out this recipe, but do you have a conversion for grams for the flour, by chance? Everyone’s “1 cup” is different, and I prefer metric. Thanks.
I have made your recipe a couple of times now and they are probably the only cut-out cookies that have ever turned out great for me. Thanks for re-posting with updated photos. I will try next time with plastic wrap!!!
Mine never come out looking as perfect as these . . . I will definitely be giving this a try! Bookmarked! Thanks, Glory! ! !
I tried twice and mine didn’t work either. Didn’t know I needed big expensive mixer either