I’ve recently been fixated on the beauty of graduated layers of color, also called ombre. From ribbon, to curtains, fashion, and of course cakes I’ve been seeing gorgeous ombre colors all over the place! Several months ago I saw a beautiful cake from Call Me Cupcake, and shortly after saw a gorgeous ruffled cake by Fondant Flinger. I wanted to merge the ideas a bit, and wanted a way to include some great texture on the outside of the cake, without creating time consuming fondant ruffles. I remembered I am baker’s gorgeous rose cake, and thought a smaller version of the rose-like swirls could be the perfect finishing touch!
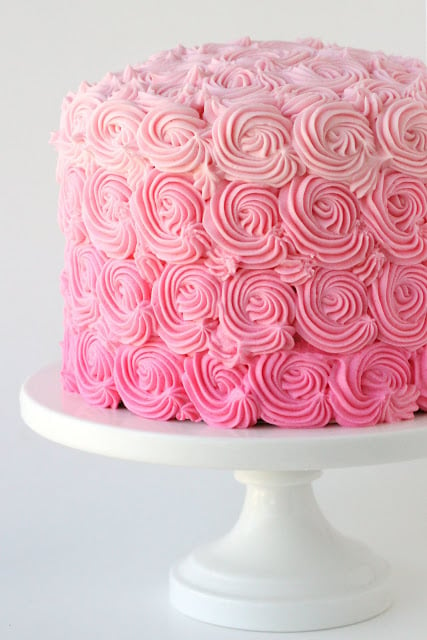
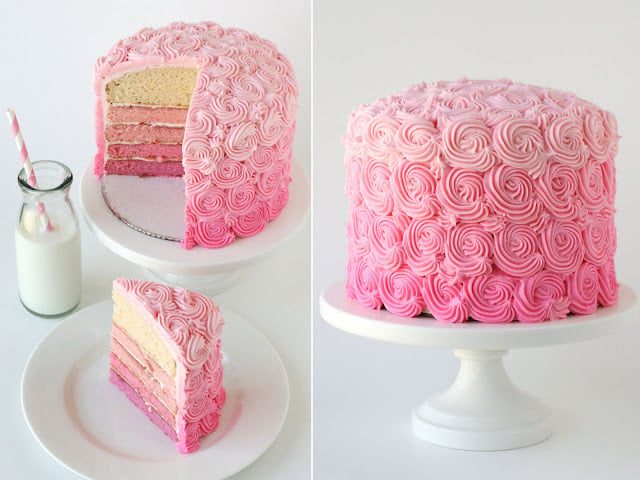
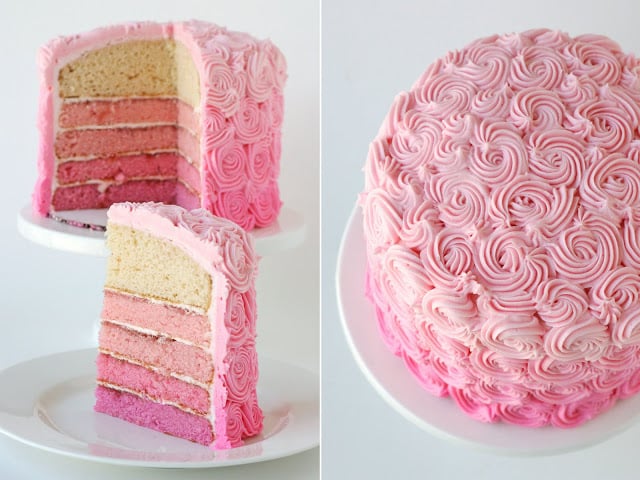
Here is my pretty pink, swirly cake!
How to create this Pink Ombre Swirl Cake ~
For the cake, I doubled my Perfect Vanilla Cupcake recipe.
The cake above is a 6″ cake, and I reserved a little batter for a few vanilla cupcakes. You could certainly do this cake as an 8″ cake. For an 8″ cake I would suggest multiplying the recipe by 3 (if using my recipe linked above) if you want a nice tall cake. Of course you are welcome to use any other vanilla cake recipe, or a box mix.
I divided the batter as evenly as possible between 5 bowls, coloring the darkest layer first, and working from that color as a guide. I used Americolor gels in soft pink, electric pink, and a bit of electric purple (in just the darkest layer). Add the batter to prepared cake pans (greased and floured, and lined on the bottom with parchment paper). Also, you probably don’t have 5 matching cake pans (nor do I), so you’ll have to bake the layers separately (hopefully you have at least 2 matching pans). Bake and fully cool the cakes.
Prepare a batch of American Buttercream Frosting. Again, I made a 6″ cake, so for an 8″ cake, I would suggest multiplying the recipe by 1.5. I divided the frosting between four bowls, one bowl with a bit more than the others (the one that will be the lightest color, because it’s used for the top as well as one row of swirls). I colored the frosting with Americolor soft pink and a little electric pink (for just the darkest color). Also, reserve a small amount of frosting (maybe 1 cup) in the mixing bowl, to use between the layers, and to very thinly frost the outside (crumb coat).
Assembly ~
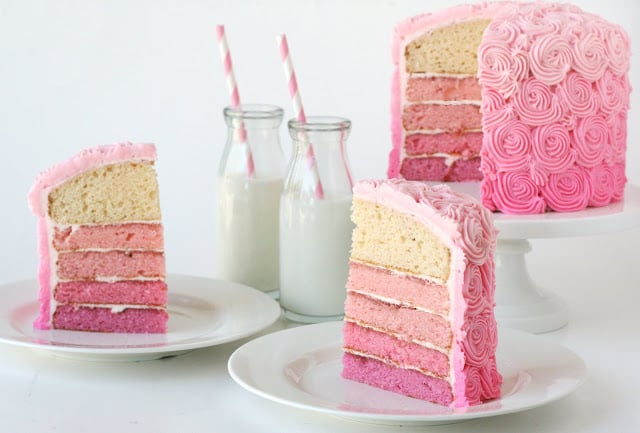
Layer the cakes, darkest on the bottom, frost with a very thin layer of icing between each layer. Because I didn’t want too much frosting between the layers (to detract from the colors of the cake), I brushed each layer of cake with warmed cherry jam (most any flavor you like could be used). You could also use a simple syrup, orange juice, or omit this step. Frost the outside of the cake with a thin layer of frosting. Smooth as well as you can (I use an offset spatula), but it doesn’t need to be perfect. Place the entire cake in the freezer about 10 minutes for the icing to set, and the whole cake will firm up (making it much easier to decorate).
Prepare a piping bag with a #21 Wilton tip (a moderate sized open star). This is the tip I used, but other open star tips could also work. Fill piping bag with the darkest color icing. Remove cake from freezer, and start along the bottom of the cake, creating rows of swirls. For each swirl, start in the center of the “rose” shape and pipe in a spiral around the center, about 1 1/2 rotations. Continue along the bottom of the cake, creating rose-like swirls. Repeat with remaining colors of icing. You may find that there will be some areas in each row that don’t get fully covered, to fill in the little empty spaces just squeeze in some icing, in a curved shape (like a “C”) to mimic the rest of the swirls a bit. For the top of the cake (shown below) I used a combination of swirls and some “C” curves for a looser, wavy effect.
Once fully frosted, store the in the refrigerator until ready to serve. Serve with milk, or coffee to accompany the pure sweetness of this cake.
How to Make Pink Ombre Swirl Cake
Pink Ombre Cake
Ingredients
Vanilla Cupcake Batter
- 2 1/2 cups cake flour
- 1 1/2 teaspoons baking powder
- 1 teaspoon baking soda
- 1 teaspoon salt
- 4 eggs
- 2 cup sugar
- 3 teaspoons pure vanilla extract
- 1 cup oil vegetable canola or extra light olive oil
- 2/3 cup milk whole or low fat, but avoid fat free
- 2/3 cup sour cream full fat or light, but avoid fat free
American Buttercream Frosting
- 1 1/2 cup butter 3 sticks, salted, or unsalted
- 1/3 teaspoon salt if using unsalted butter
- 6 cups powdered sugar
- 1 1/2 teaspoon vanilla extract best quality available
- 3-4 tablespoons heavy cream half and half or milk
Instructions
Vanilla Cupcake Batter
- Preheat oven to 350*F.
- In a medium bowl, add cake flour, baking powder, baking soda and salt. Stir together with whisk, and set aside.
- In the bowl of an electric mixer, add eggs and beat 10-20 seconds. Add sugar and continue to beat on medium speed about 30 seconds. Add vanilla and oil, beat.
- Reduce mixer speed to low and slowly add about half of the flour mixture. Add the milk, then the rest of the flour and the sour cream. Beat until just combined. Scrap down the side of the bowl.
- The batter will be thin. Add the batter to prepared cake pans (greased and floured, and lined on the bottom with parchment paper).
- Bake in pre-heated oven for 12-14 minutes.
- Let cool for 1 to 2 minutes
American Buttercream Frosting
- In the bowl of an electric mixer, fitted with the whisk attachment, beat butter (on medium speed) until completely smooth (30 seconds to a minute).
- Add salt (if needed).
- One cup at time, add 2 cups of powdered sugar, beating after each addition.
- Add vanilla, or other flavorings and beat to combine.
- Add about 1 tablespoon of cream, and continue beating.
- Add the remaining 2 cups powdered sugar, one at a time.
- Add an additional 1-2 tablespoons cream until desired consistency is reached. If you want to pipe the frosting on cupcakes, the frosting should be nice and thick. Continue to beat another minute or so. The frosting should now be smooth and fluffy.
Assembly
- Layer the cakes, darkest on the bottom, frost with a very thin layer of icing between each layer.
- Frost the outside of the cake with a thin layer of frosting.
- Smooth as well as you can (I use an offset spatula), but it doesn’t need to be perfect.
- Place the entire cake in the freezer about 10 minutes for the icing to set, and the whole cake will firm up (making it much easier to decorate)
Decorate
- Prepare a piping bag with a #21 Wilton tip (a moderate sized open star). This is the tip I used, but other open star tips could also work.
- Fill piping bag with the darkest color icing.
- Remove cake from freezer, and start along the bottom of the cake, creating rows of swirls.
- For each swirl, start in the center of the “rose” shape and pipe in a spiral around the center, about 1 1/2 rotations.
- Continue along the bottom of the cake, creating rose-like swirls. Repeat with remaining colors of icing. You may find that there will be some areas in each row that don’t get fully covered, to fill in the little empty spaces just squeeze in some icing, in a curved shape (like a “C”) to mimic the rest of the swirls a bit.
- For the top of the cake (shown below) I used a combination of swirls and some “C” curves for a looser, wavy effect.
- Once fully frosted, store the in the refrigerator until ready to serve. Serve with milk, or coffee to accompany the pure sweetness of this cake.
Nutrition
I would love to see some of you try this in other colors… yellows to orange, shades of lavender, or light turquoise to teal… oh I made need to make another one soon! What colors will you try?
Happy baking!

I love these recipes and the images of the cakes are beautiful. I wondered if I could post the picture of the pink cake on the sidebar of my blog, as long as there is a link connecting back to your site. My blogging identity is tied into cake and my blog site is pink, so I like to put images of pink frosted cake there. I will definitely try this recipe! Please let me know if this would be okay.
Thanks and kind regards,
Sandee Harris
Hi Sandee, So glad you like my cake! Feel free to share one image as long as there is a link back to my post.
I am going to try this tonight for my mom’s bachelorette brunch party tomorrow – hopefully it will come out amazing, I’ll update ya and let you know! 😀
I just found out about this site,(via a Dutch site named beautygloss.nl) and I immediately loved it! And I’m sure I’m gonna try to bake this cake one day, thanks for the inspiration!
Is the top layer thicker than the rest of the layers? If so, did you add more to that cake pan?
Hi Valerie,
Yes, in this case the top layer is thicker, but that was an accident more than anything. Ideally, each layer should be very close to the same height.
Hi
when you mentioned cake pan, it is non sitck ?
Hi Valerie, I do not use non-stick pans, but you may if you like. I prepare my pans by lightly coating the pan in butter or oil, then sprinkling a bit of flour in the pan, shake all around, and dump out any excess. I would also recommend lining the bottom of the pan with parchment paper.
I’ve made this cake 2 times and am making my 3rd today. I’ve made purple and blue and this will be the first time I do pink! It’s for a baby shower and its going to be perfect!! I also use almond extract instead of vanilla. The second time I made the cake I was out of vanilla and did not have time to go to the store so I used almond. It was perfect! It gives it a different flavor and makes it unique!
I really admire you!! I am 16 and I love baking and decorating! I will try to make this cake tomorrow. The recipe seems easy! I hope it turns out good! Thank you for your recipes! 🙂
I’m making this right now!!! Hope it ends like yours
you are so amazing!!! i just found your page and i’m so stunning!!
love your recipes very much!!! .. i really have to try them!!
and your photos are also amazing!! 🙂
love the style of your website and everyhting !!
YOU ARE AMAZING!! *g*
love from germany
I love,love, love this idea. I am doing rainbow colors in May for my daughters 2 birthday 🙂 so excited, and it will be my first fondant cake also 🙂