Making pretty decorated cookies is a hobby I have been learning and growing in for the past couple years. Although I did learn the basics of baking as a child (from my mom), it wasn’t until I took a gourmet cookie decorating class in 2007 that I became completely obsessed with learning to perfect this art. There will always be new techniques and new designs to try, but I have been able to produce quite a number of cookies I’m happy with over the last few years (obviously I don’t take photos of the ones I’m not happy with!). But the process of making cookie dough, rolling and baking the cookies, making icing, and then actually decorating the cookies is a pretty time intensive project. Because I spend so much time on each cookie, I really want the cookies to be presented in a way that shows the off properly. Hand decorated cookies make beautiful gifts and favors, and some pretty packaging is the perfect way to really showcase your hard work. I think some thoughtful packaging can turn “just a cookie” into a beautiful gift.
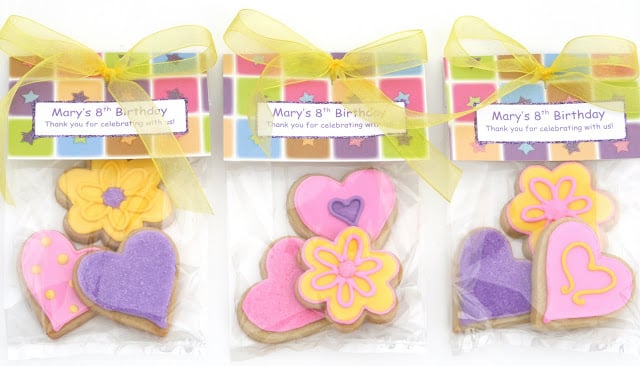
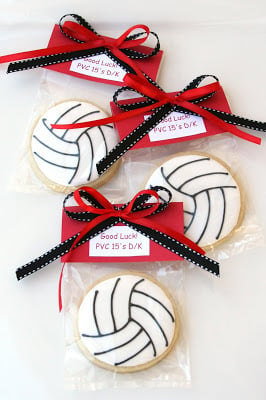
One of the ways I package cookies is with custom fold-over tags, and some pretty ribbon. The tags can be made with most any heavy weight paper or cardstock (scrapbooking paper). Tags can be made with plain or patterned paper, and you may also want to add a printed message to further personalize the packaging. If you want a message, I usually print out the message (from my home computer) onto white cardstock, cut them to my desired size, and then paste them onto the larger tag (using double sided tape, a glue stick, or most any scrapbooking adhesive).
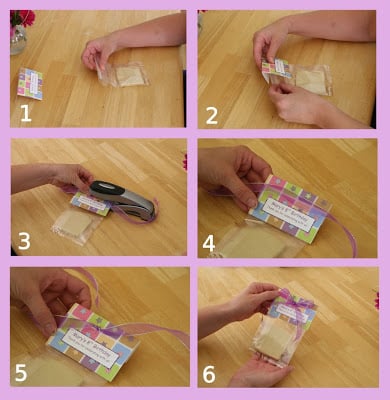
Below is the step by step assembly. I’m sure there are many other ways to get a similar look, this is just the way I do it.
1. Place cookie in bag and fold down the top of the cellophane bag twice.
2. Cover the fold with a prepared tag made from cardstock.
*I use my scrapbooking cardstock, and cut them 4 inches (the width of my bags), by 3 inches. Then I pre-fold the tags (using a bone folder) so that 2 inches of the tag will be to the front, and one inch of the tag is folded over. If I want a message on the finished tag (like the ones above), I print out messages on white cardstock, then glue that onto the colored cardstock tags.
3. Staple the folded tag over the folded cellophane AND a (pre-cut) strip of ribbon.
4. This shows the ribbon and tag stapled.
5. Tie the ribbon once, then make a bow. (I tie the ribbon before making the bow so that the finished bow lays straight)
6. Finished favor bag (just ignore the fact that the cookie isn’t decorated!) =)
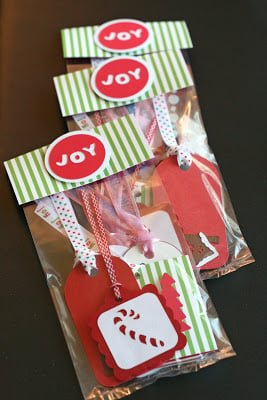
I’ve also used this same basic idea to package other little gifts. Below are some bags of handmade gift tags I gave to some of my friends this past Christmas (well, actually in early December, so they could use them at Christmas).
The bags I almost always use for cookie packaging are the Wilton brand 4″x 9.5″ bags. I buy mine at Michael’s craft store or Wal-Mart (in the cake decorating section). There are many other bags available on-line, but I just like the feel of the Wilton bags. Any other brands I’ve found are a much stiffer/crisper cellophane, but it just comes down to personal preference.
Great Blog!!! Thanks for sharing this blog for packaging of cookies. Very useful information.
hi,ur site is simply awesam.love how u do all ur baking.i live in pakistan .and will definetly try these ideas.
Hi Glory, Can I ask what a ‘bone folder’ is? Sounds like it would make the task easier?
Mary- A bone folder is a tool that you can use to “draw” or impress a line on a piece of paper, and then the paper will fold in a nice, crisp crease along that line. They are sold in the paper crafting area in any major craft store.
Hi, I was just wondering how far in advance can you make and package cookies?
Robin, In general, if you use the same recipe I do, the cookies will stay fresh and delicious at least a week.
I must say that I read this a couple of months ago and loved it….I've been thinking about your technique and couldn't get it right so I finally found your post again. Yay! Thank you so much!! 😀
Hi, I just joined your blog and I want you to know that I love it!! Thank you so much for this tutorial, but have a quick question. On the steps it shows that you stapled the label, but where exactly? did you staple on top of the ribbon? I just don't see the staple in the finished product.
Ok, thanks a million!!! 🙂