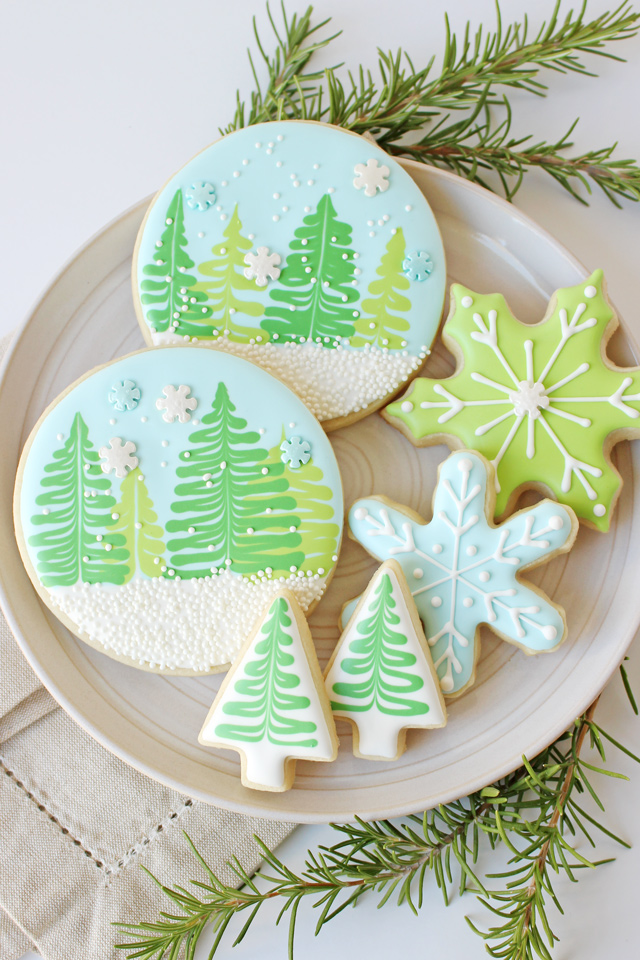
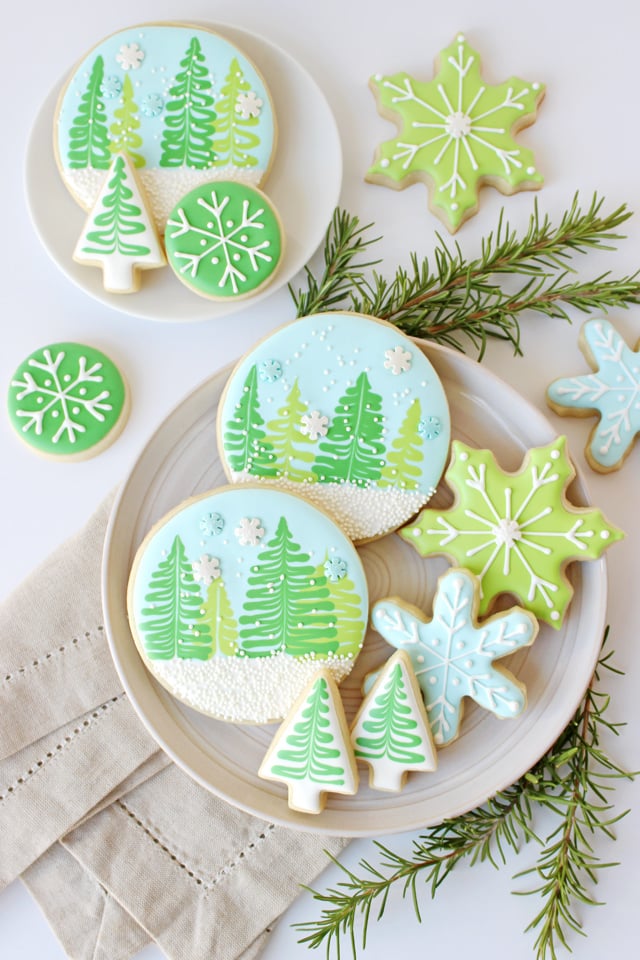
These simple and beautiful Winter Wonderland Cookies are perfect for any winter holiday or party!
Here in California we still have lots of sunshine… but I can dream of snow with these cute cookies!
One of my favorite things about this set of cookies is that it only requires a few icing colors and some very simple techniques to create a fun and engaging collection!
And although these cookies would be adorable for Christmas, they’d also be perfect for any winter holiday or party… all the way into January.
Let’s decorate and dream of snow together!
PIN IT NOW to save for later!
Winter Wonderland Cookies Decorating Instructions –
Start with a batch of my Perfect Sugar Cookies.
For this set you’ll need some round cookies (large and mini), some snowflakes and a simple tree (I used a mini tree cutter from Ecrandal, but I do not see it on their site currently).
Prepare a batch of Royal Icing.
For this set, I made…
Pale blue icing with a #2 tip, medium/flood consistency
Lime green icing with a #2 tip, medium/flood consistency
Medium-dark green icing with a #2 tip, medium/flood consistency
White icing with a #1.5 tip, piping consistency
White icing with a #2 tip, medium/flood consistency
You’ll also need white non-pareils sprinkles and white and/or light blue snowflake sprinkles (optional)
I’m trying something new and sharing the decorating process with a video, in place of step-by-step photos.
I’d love your feedback as to which you prefer (photos or video). Please don’t say “both”… I’m only human! =)
Enjoy this short video for the step-by-step decorating tutorial…
A few additional decorating notes…
For the large round cookies (the tree scene), the trees should be added immediately after the cookie has been “flooded” with the white and blue icing.
For the mini trees, (pictured in this post, but not show in the video) the same technique (called “wet-on-wet”) should be used.
For the snowflakes, outline and flood the cookies, then allow to dry (1-4 hours) before adding the white details.
How to Make Sugar Cookies and Royal Icing

Sugar Cookies and Royal Icing
Ingredients
Perfect Sugar Cookies
- 3 cups all-purpose flour
- 1 teaspoon baking powder
- 1/4 teaspoon salt good quality
- 1 cup unsalted butter 2 sticks, room temperature
- 1 cup sugar
- 1 egg large
- 1 teaspoon vanilla extract good quality, see flavor options in notes
Royal Icing
- 4 tablespoons meringue powder
- 4 cups powdered sugar about 1 pound
- 6 tablespoons warm water to start
Instructions
Perfect Sugar Cookies
- In a medium bowl, stir together the flour, baking powder and salt, and set aside.
- In the bowl of an electric mixer, using the paddle attachment, cream together the butter and sugar until light and fluffy. This should take 2-3 minutes.
- Add the egg and vanilla and beat another minute or so.
- Add the flour mixture slowly. (Be careful not to add too much at a time or you will have a snowstorm of flour.)
- Blend until all of the flour is incorporated. The mixture will look crumbly at first but just keep blending until the dough begins to pull away from the sides of the bowl.
- Remove about half of the dough from the bowl and knead by hand just a bit to form a smooth ball. Roll out dough onto a lightly floured work surface, or onto a piece of plastic wrap (as described in detail in the blog post above).
- Cut out cookies into desired shapes and place entire baking sheet of unbaked cookies into the freezer for 5 minutes.
- Preheat oven to 350°F and bake cookies in preheated oven for 9-11 minutes, depending on the size and thickness of your cookies.
- The cookies are baked when then are no longer shinny on top, but they will not show much of any change in color.
- Cool on baking sheet just a minute or so, then carefully move to a wire cooling rack and allow to cool fully before decorating.
Royal Icing
- Beat all ingredients until stiff peaks form.
- Spoon some of the thick white icing into individual bowls and add coloring .
- Add additional water, about 1 teaspoon at a time until you’ve reached the consistency you need.
Notes
Nutrition
PIN IT NOW to save for later!
Happy winter cookie decorating!
Disclosure – Amazon links provided for your convenience. I may receive a small commission when you shop using the links in this post.



Yummy! Too pretty to eat!
So gorgeous! We are attempting these this afternoon (my first time using this kind of icing technique). Thanks for all the details and the perfect video 🙂
I love these and plan to make them with my sister-in-law for Christmas. I’ve only decorated cookies using royal icing once before so understand the idea of flooding cookies, wet-on-wet, etc. My question is the colors. Can you tell me how you mixed the colors to get these perfect greens and blues? I have gel and liquid colors but if these colors already exist it would make things a lot easier. Thank you for your response.
Hi Annabelle, So glad you’re going to give them a try! I use both Americolor gels and Wilton (color right) gels. I’m sorry to say that the colors pictured are not necessarily exactly from the bottles, as I usually do a bit of mixing. My favorite blue ever is Americolor sky blue and I think that’s what I used for the blue. Keep in mind to add the smallest amount of color possible to start, then work up from there. The colors will deepen a bit after the dye is initially added, so add less than you think you need, stir it up, then set it aside for a few minutes while you move to other colors (be sure to keep the icing well covered). Happy decorating!
Can these be frozen once decorated? I like vet having treats ON Christmas but with so much going on I feel the pressure for EVERYTHING to be done on Christmas Eve! I,d love to spread to work load out through December.
I like the video because I can see exactly how you did it rather than trying to fill in the gaps with photos.
Thanks for doing this! Royal icing is my nemesis!
Hi Risa, Sadly, I do not recommend freezing the cookies once decorated. But there are a couple other options… You can freeze the baked cookies, and then decorate them a several days before the event. Once decorated (and the icing has dried) the cookies will stay nice and fresh (in a tupperware type container, or individually bagged) for at least a week.
Beautiful. I’ve never decorated cookies but you’ve inspired me to try it for Christmas
Love the video, you make it look easy and my favorite is the round cookie with the tree scene. Although I love them all
Consistency is so hard for me? I’ve been trying to write Jesus on a cookie and it didn’t go well, I’m not much of an artist?
I love these beautiful cookies and I love the consistency of your Icing.. I have used eggs for royal and powder …I do say the powder works much better for the application of this. I make gingerbread houses that I prefer the egg royal Icing…(referring to the above comments). You make these look so easy. You have a nice steady hand. You make me want to save the cookies and just look at them, but the icing looks so good I would have to eat them! lolol So, you have done your job two fold! I look forward to watching more videos. Awesome Job!
Hi Glory! Thank for this fantastic video,recipes and tutorial. I keep practicing! I teach high school cooking class and some may try it as well.
Thanks for your sweet comment! And thank you for teaching!
Love the VIDEO! Saw this shared by a friend on Facebook. Love it, love it! Can’t wait to try to make these beautiful cookies! 🙂 Merry Christmas and thank you for sharing!
Thanks so much! Merry Christmas to you as well!
Hello- I’ve always been a big fan your designs so the tutorial was a welcome bonus. I had just made a bunch of cookies yesterday when I saw this. I decorated them like yours last night. What i especially love about these were the serene color combinations. The colors don’t require an excessive amount of food color which is always a plus.
Thank you so much for your lovely comment! Please feel free to share a photo of your cookies on my Facebook page, or tag @GloriousTreats on Instagram. I’d love to see them!